
You need sales systems if you want to close more sales and increase your revenue. In particular, you need to understand every stage of your sales pipeline.
Not only will this understanding help you make your sales processes more efficient, but it will also help you identify any shortcomings in your current process.
With that in mind, let’s break down the 8 key sales pipeline stages, so you know what it takes to convert a prospect.
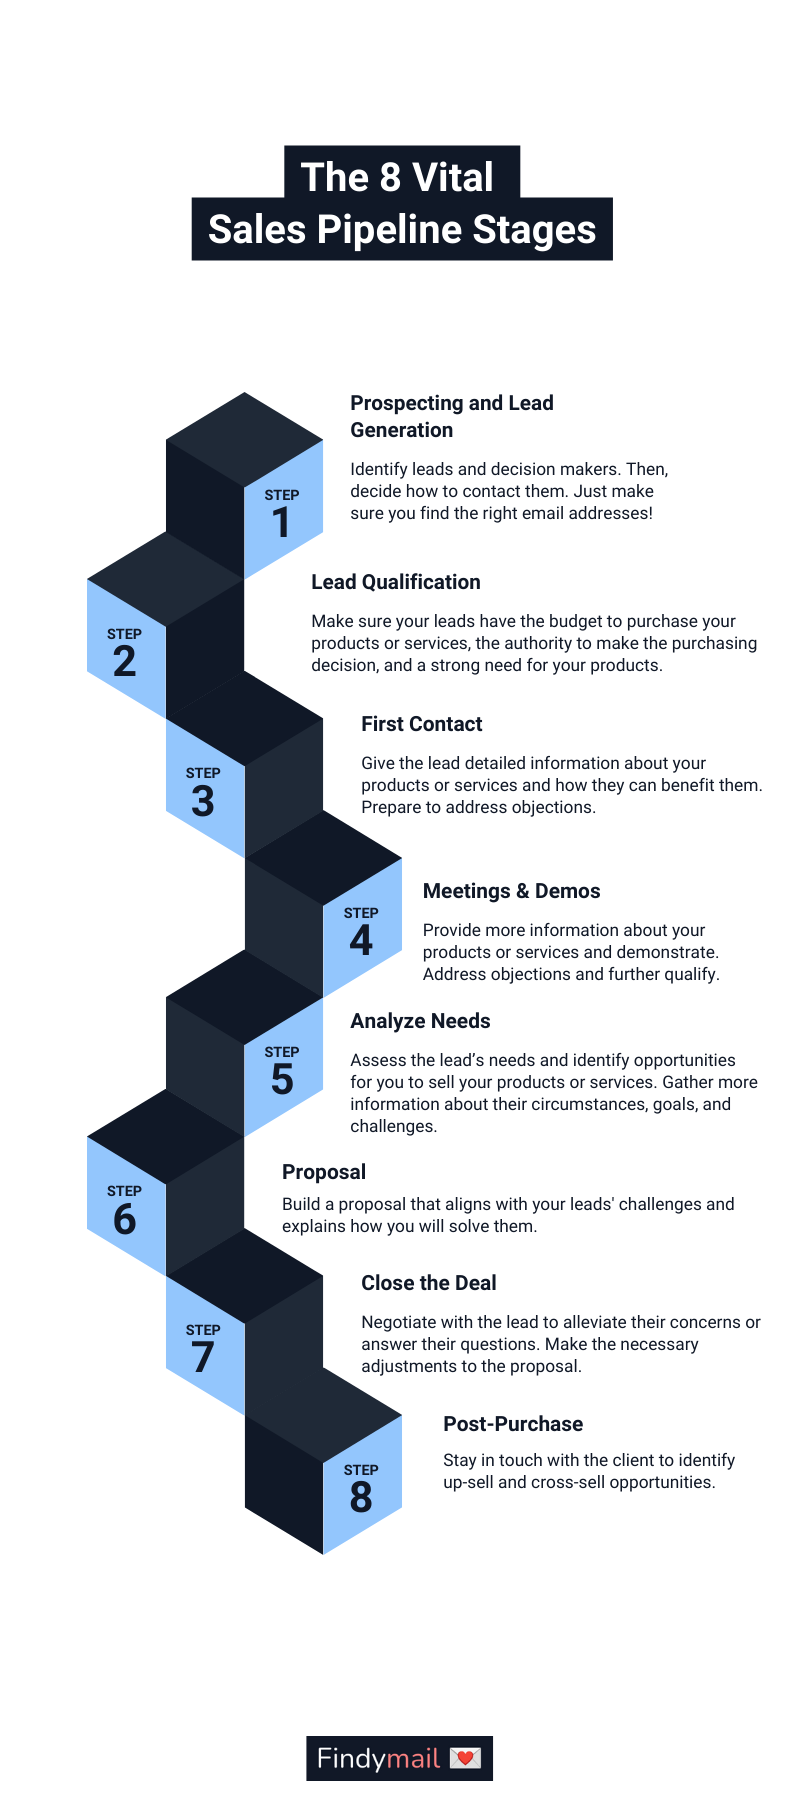
First Sales Pipeline Stage: Prospecting and Lead Generation
Before you can make a sale, you’ll need to generate leads. Since only 4% of leads convert, you’ll need many of them. That’s what the first sales pipeline stage is here for!
During this stage, you’ll identify leads by deciding the types of businesses you want to target. In other words, you’ll create an ideal buyer persona. Once you know who you want to target, you’ll quickly figure out who calls the shots, i.e., who the decision-makers in these companies are.
Cold calling was the go-to strategy for reaching decision-makers in the past, but cold emails are becoming increasingly popular. To reach out to these leads, you’ll need to send them emails and follow up consistently to book a meeting.
Before firing off your cold email, make sure you find the right email addresses through LinkedIn, Sales Navigator, or a contact database. Then, personalize the email templates to specific buyer personas, and fire away!
Sales Pipeline Stage 2. Lead Qualification
Once you’ve gathered leads following the process above, you’ll need to qualify them. During qualification, you’ll make sure they have:
- The budget to purchase your products or services
- The authority to make the purchasing decision
- A need for your products
Lead qualification is also, in a sense, a process of discovery. So, you’ll aim to learn more about the lead, their business, the challenges they face, and decide if they’re a good fit for your products or services.
During this process, you’ll also nurture your leads and increase their interest in your products.
Ultimately, the goal of the lead qualification is that the lead, after receiving a sequence of communication (typically emails) from you, shows an interest in your products or services and agrees to get more information from you.

Sales Pipeline Stage 3. First Contact
When you have a qualified lead in hand, it’s time for the first contact with them. Now, this first contact can take many different forms depending on your preferences or circumstances.
For example, some companies might use warm calling to make contact, while others prefer video calls. In turn, some companies prefer meeting face-to-face at this stage.
Either way, you’ll give the lead detailed information about your products or services and how they can benefit them. It’s also at this stage that you’ll be able to deal with any objections the lead might have. Make sure you’re thoroughly prepared and you can make the lead act on your offer.
When you’re ready, ask for meeting availability.
Stage 4. Meetings and Demos
At the meeting with the lead, you’ll typically give a presentation or demonstration of your products or services. Like the initial contact, the meeting depends on your offer and your leads’ preferences.
For instance, you might opt for an in-person demonstration when selling physical products. Likewise, when you, for example, sell a software product, you could have the meeting virtually and show them a product demo, proving that your product can do everything they need.
No matter what type of meeting you have, you’ll provide more information about your products or services and demonstrate how they could work for the lead. During the meeting, you’ll also gauge the lead’s level of interest and qualify them further.
Once a definite interest has been identified, you’ll move the lead to the next stage in the sales pipeline.
Stage 5. Needs Analysis
The next stage in the sales pipeline is a needs analysis. During this stage, you’ll assess the lead’s needs and challenges and identify opportunities for you to sell your products or services.
So, to do this, you’ll gather more information about:
- Their circumstances
- What they want to achieve
- The challenges that prevent them from reaching their goals
For example, if you were selling ATS recruitment software, you could deal with a lead that recently started a hiring spree and needed to recruit for more than 20 positions within (ideally) the month. At the needs-analysis sales pipeline stage, you’d find an opportunity to prove your offer can help them achieve their goal.
The needs analysis process typically starts at the meeting above but can take some time, depending on the information you gather and the research you do. Based on the information you collect, you’ll develop a strategy to close the deal.
Sales Pipeline Stage 6. Proposal
The first step in your deal-closing strategy is making a proposal. And creating the perfect proposal is about more than sending a list of products and their prices.
Instead, in your proposal, you should focus on the challenges the lead is trying to solve and how you can help solve them.

When creating your proposal, you should consider a few other aspects. For one, you should ensure that your offering aligns with the lead’s budget.
Also, while you should provide as much information as possible in your proposal, it’s always a good idea to be as concise as possible. Personalize the proposal to the lead (especially if it’s an important one) and make everything about them and their goals. Treat your offer as a means of reaching their desired end.
Stage 7. Time to Close the Deal!
If the lead accepts your proposal, send them a contract. Once it’s been signed, congratulations! Your lead just became a customer.
Unfortunately, things aren’t always this simple. The lead might have concerns or questions before making a purchase.
When this happens, you’ll need to negotiate with the lead to alleviate their concerns or answer their questions. During the negotiation process, listen to what the lead is looking for and what they would like to change in your proposal.
Then, identify opportunities and possible amendments. Ultimately, you should come to a mutually-beneficial agreement.
Stage 8. Post-Purchase
Your sales funnel doesn’t stop when you’ve closed the deal. Once the contract is signed, focus on delivering a stellar customer journey. Help your customer use the product or service, answer their questions, and help them solve any issues they encounter.
It’s the customer experience that makes your customers come back for more and gives you more upselling and cross-selling opportunities.
Adapt!
Your sales pipeline should reflect your specific way of selling your products/services. Maybe you will have fewer steps, maybe you will have more steps... it's just a tool that should be helpful to your sales process.
This article described the "standard" sales pipeline, but you can find a lot of different sales pipelines templates online that could be a better fit for your specific business.
Sales Pipeline Stages Give You the Systems to Succeed
Every business has a sales pipeline, whether it knows it or not. We hope this post gave you a deeper understanding of the traditional stages, so you can adapt them to your business and your leads.
And remember: a journey of a thousand miles begins with a single step. In sales, that’s your lead generation and qualification, so make sure you’re reaching out to the right people. After that, it’s only a matter of listening and systematizing.
Happy hunting!

Valentin
Valentin Wallyn is the founder and CEO of Findymail, a SaaS platform he launched to help B2B teams discover accurate email and contact data and automate data enrichment at scale. With an IT background, Valentin combines a technical mindset with hands-on experience in outreach and growth. His work centers on improving data quality and prospecting efficiency, drawing on years of entrepreneurial experience and a deep understanding of what makes outreach campaigns succeed.