

As the largest professional social media platform, LinkedIn is a treasure trove of valuable B2B contact data.
The challenge? That information isn’t always publicly available, which means you’ll need the right methods to uncover it. In this article, we’ll you how to extract verified emails from LinkedIn profiles using extensions, search techniques, and finder tools.
Findymail makes it simple. With our core platform and Chrome extension, you can find reliable email addresses and phone numbers backed by our proprietary deep validation system – so every contact is outreach-ready.
Still on the fence? We’ll give you your first 10 emails free.
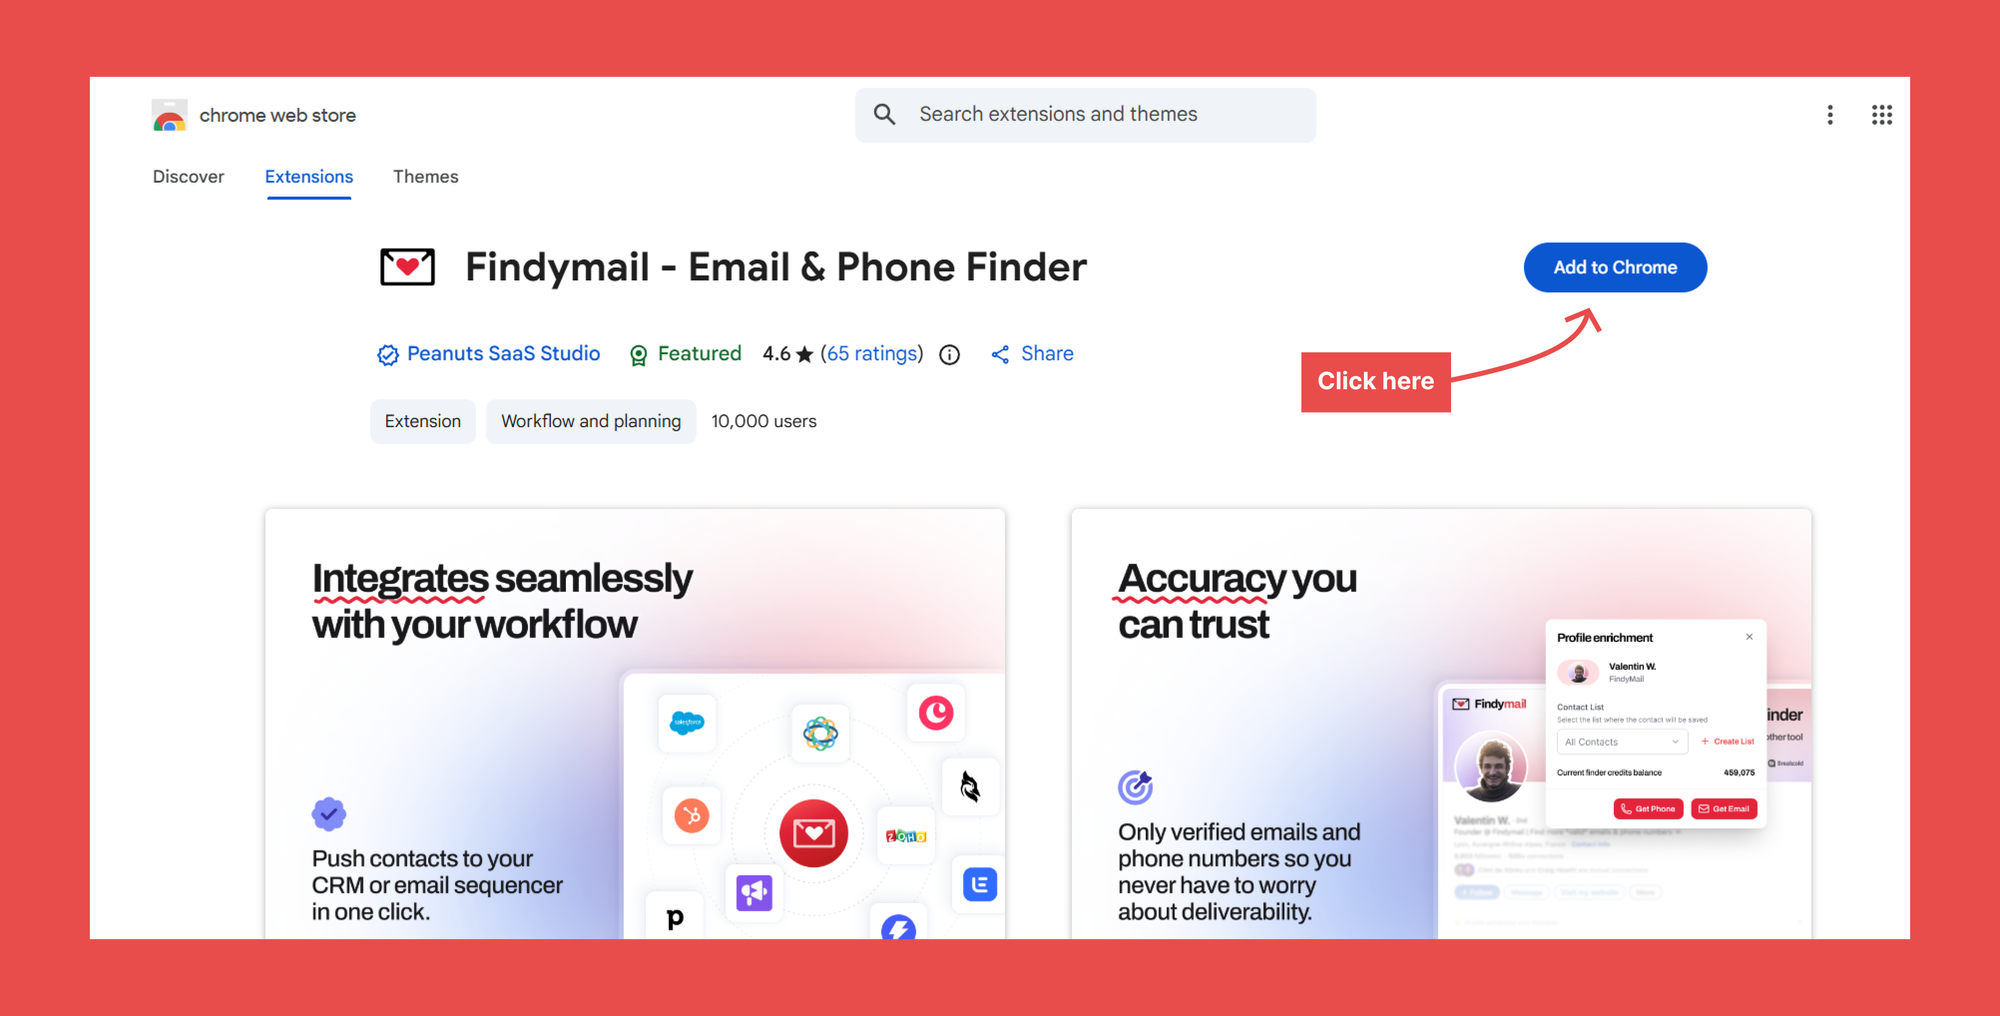
1. Use the Findymail Chrome Extension
Findymail will take care of finding someone's email on professional networks for you, with built-in email verification included. Just install the extension!
- Click here to install Findymail's Chrome extension.
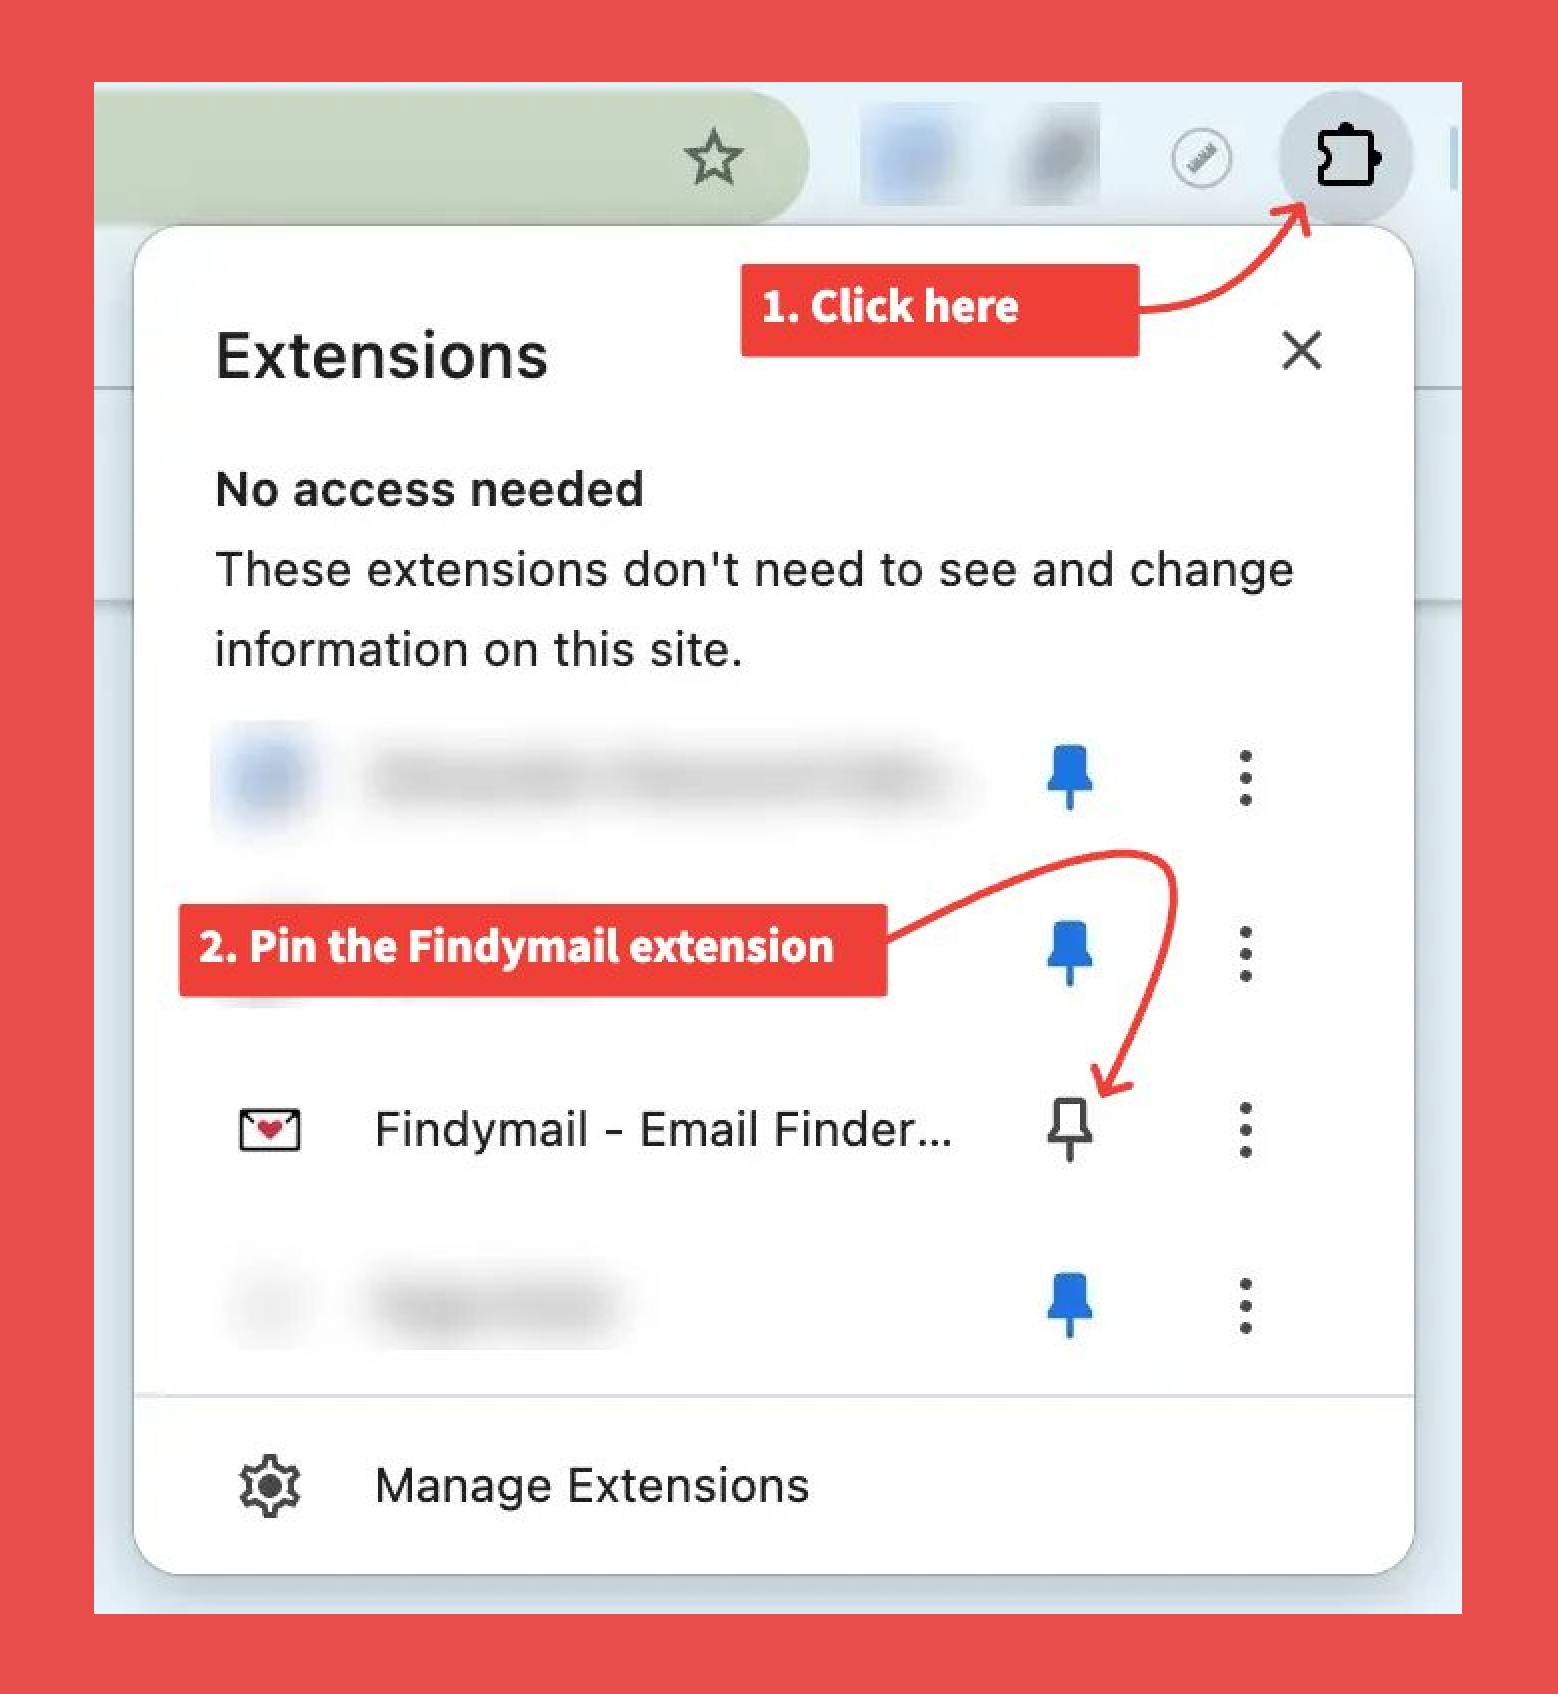
- Click on the extensions shortcut (or puzzle piece) to pin the Findymail Chrome extension.
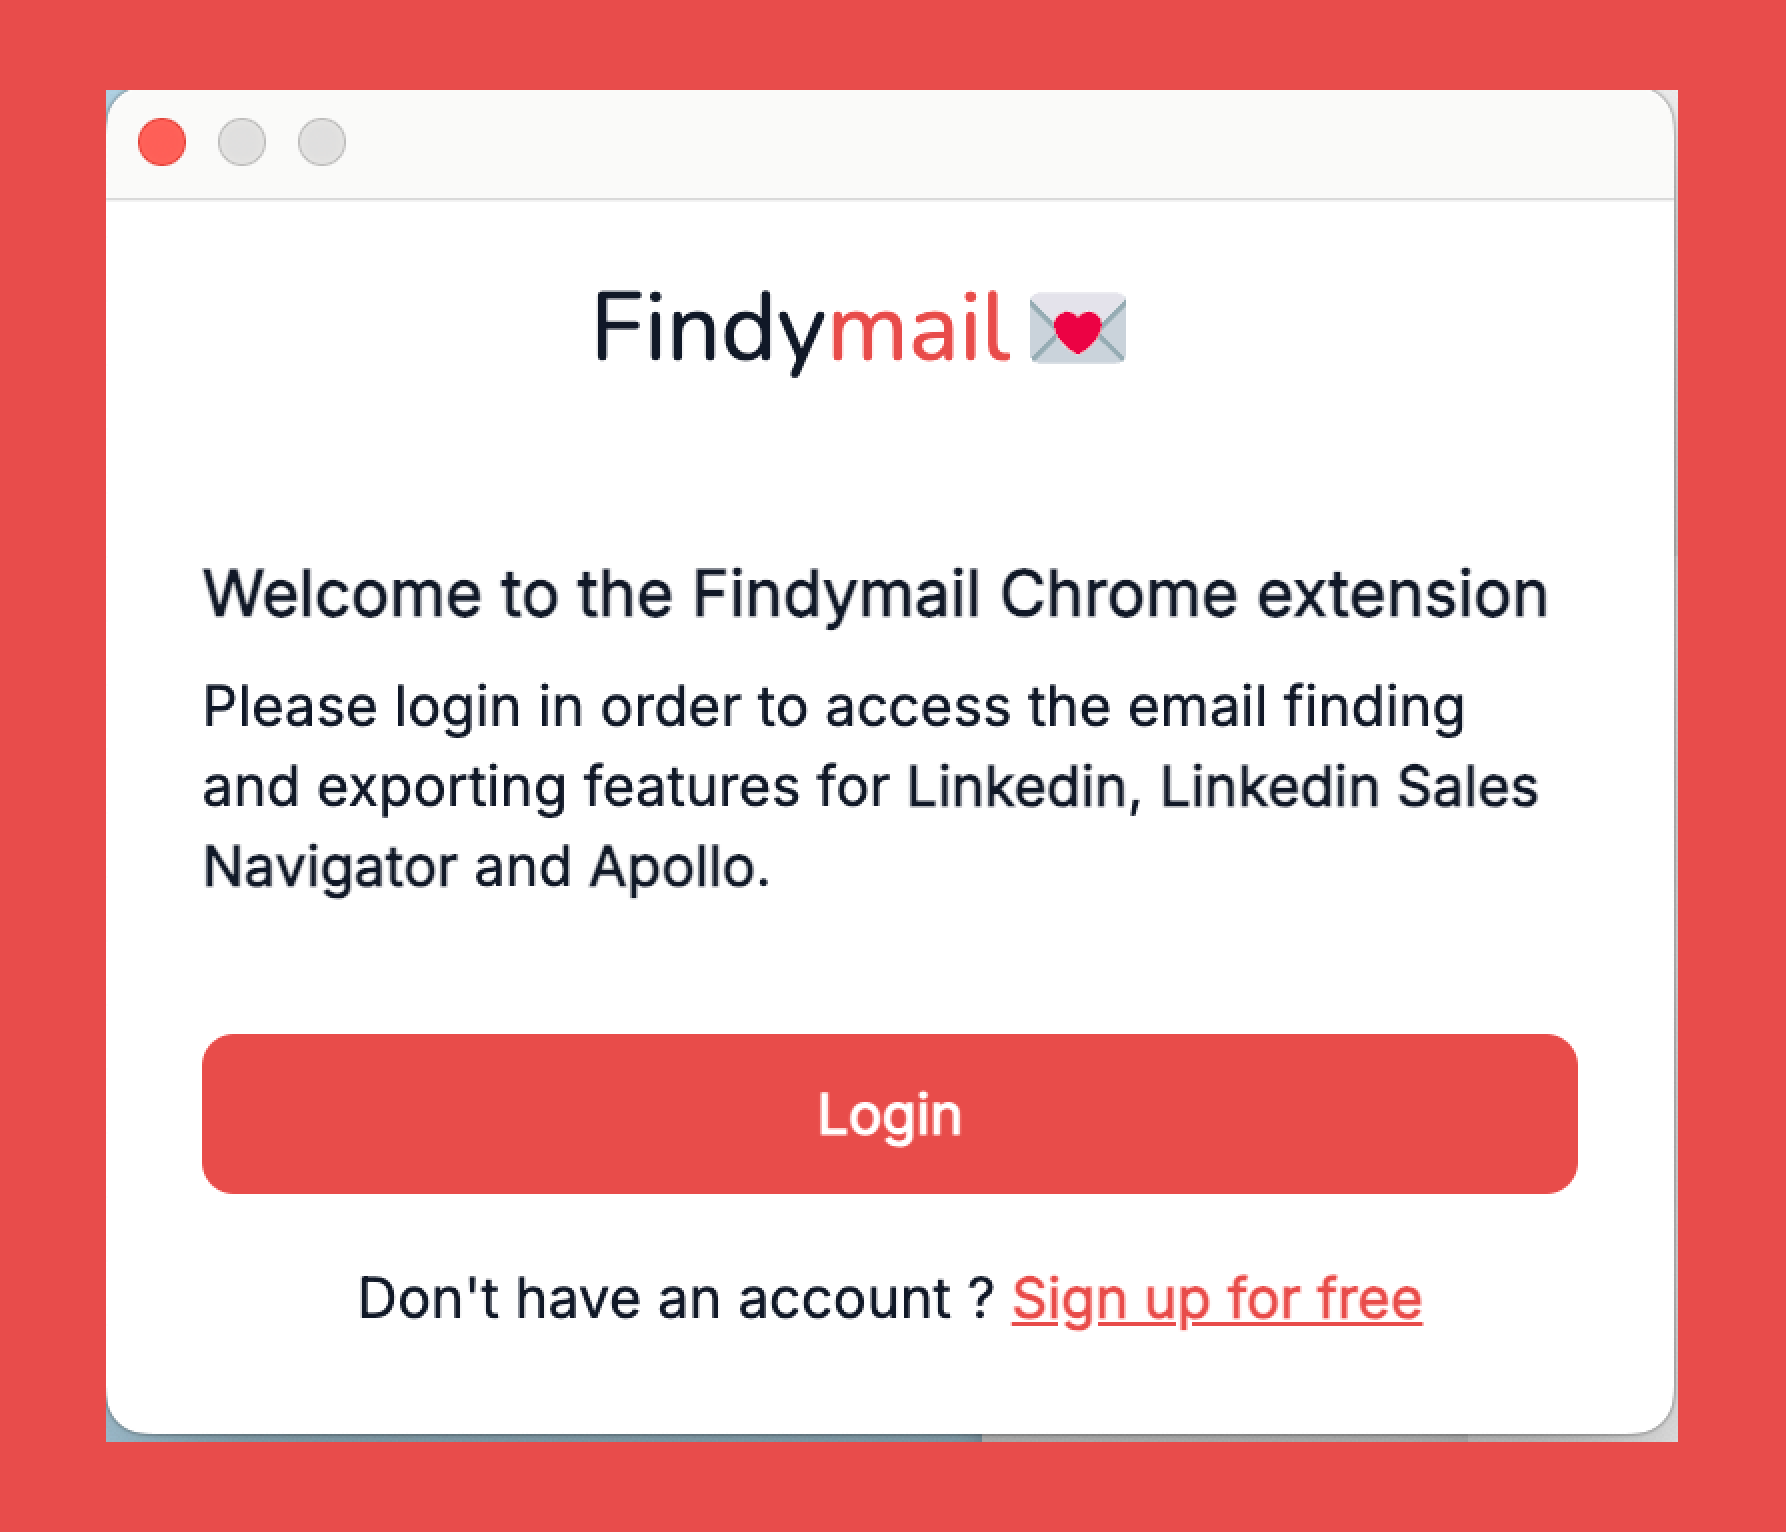
- Now click on the Findymail extension in your Chrome browser to log in.
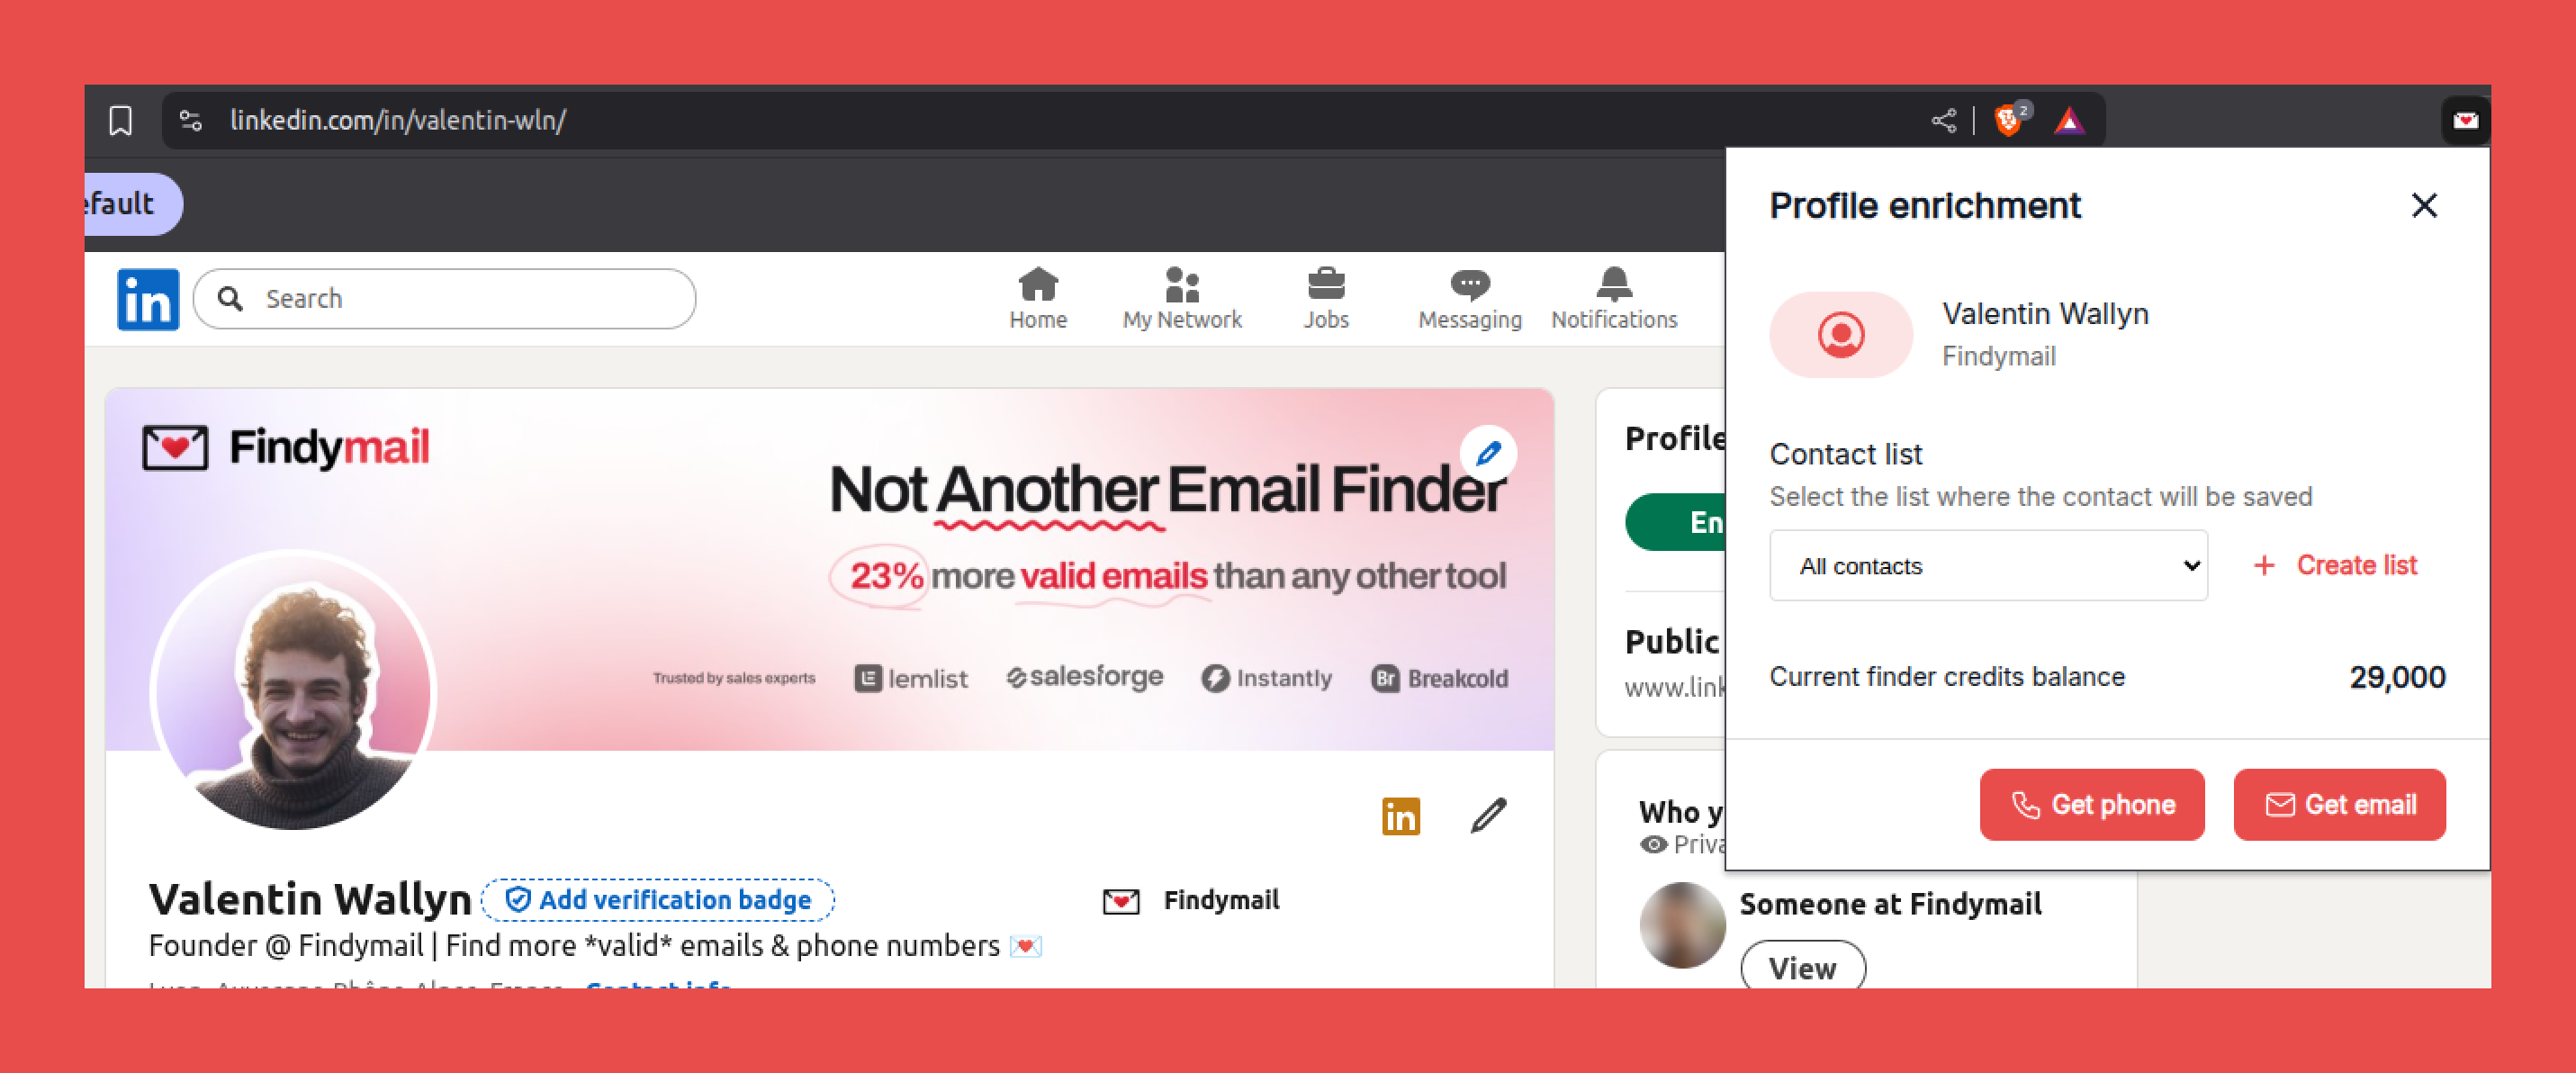
Once that is done, you can visit the lead’s professional profile and power up your Findymail extension to retrieve their verified address within a few seconds.
Now you’re ready to start emailing leads and closing deals! You can also have a look at other email finder extensions here.
2. Run a Manual Search with Sales Navigator
You can also just manually search with Sales Navigator. You can conduct targeted searches and apply filters based on profile information posted to LinkedIn.
To make the most of Sales Navigator, you need to master its Boolean search functionality. This search technique enables you to combine keywords and operators to refine your search results.
Imagine you're looking for potential leads in sales or growth roles who hold high-level positions. You could use the following Boolean search query:
In this example, you're combining different titles such as "Head," "Chief," and "VP" with relevant keywords like "Sales" and "Growth." By excluding terms like "Intern," "Assistant," and "Consultant," you narrow down your search to more senior professionals who are likely to have valuable contact information.
3. Review Your Lead’s LinkedIn Profile
One of the simplest ways to find someone’s email address on LinkedIn is by looking at their contact information. For more advanced prospecting, try an AI-powered lead finder that automatically qualifies prospects beyond basic contact extraction.
Here, you’ll click on 'Contact Info' on their profile page and find the email address on the dialogue box that opens (if they shared it).
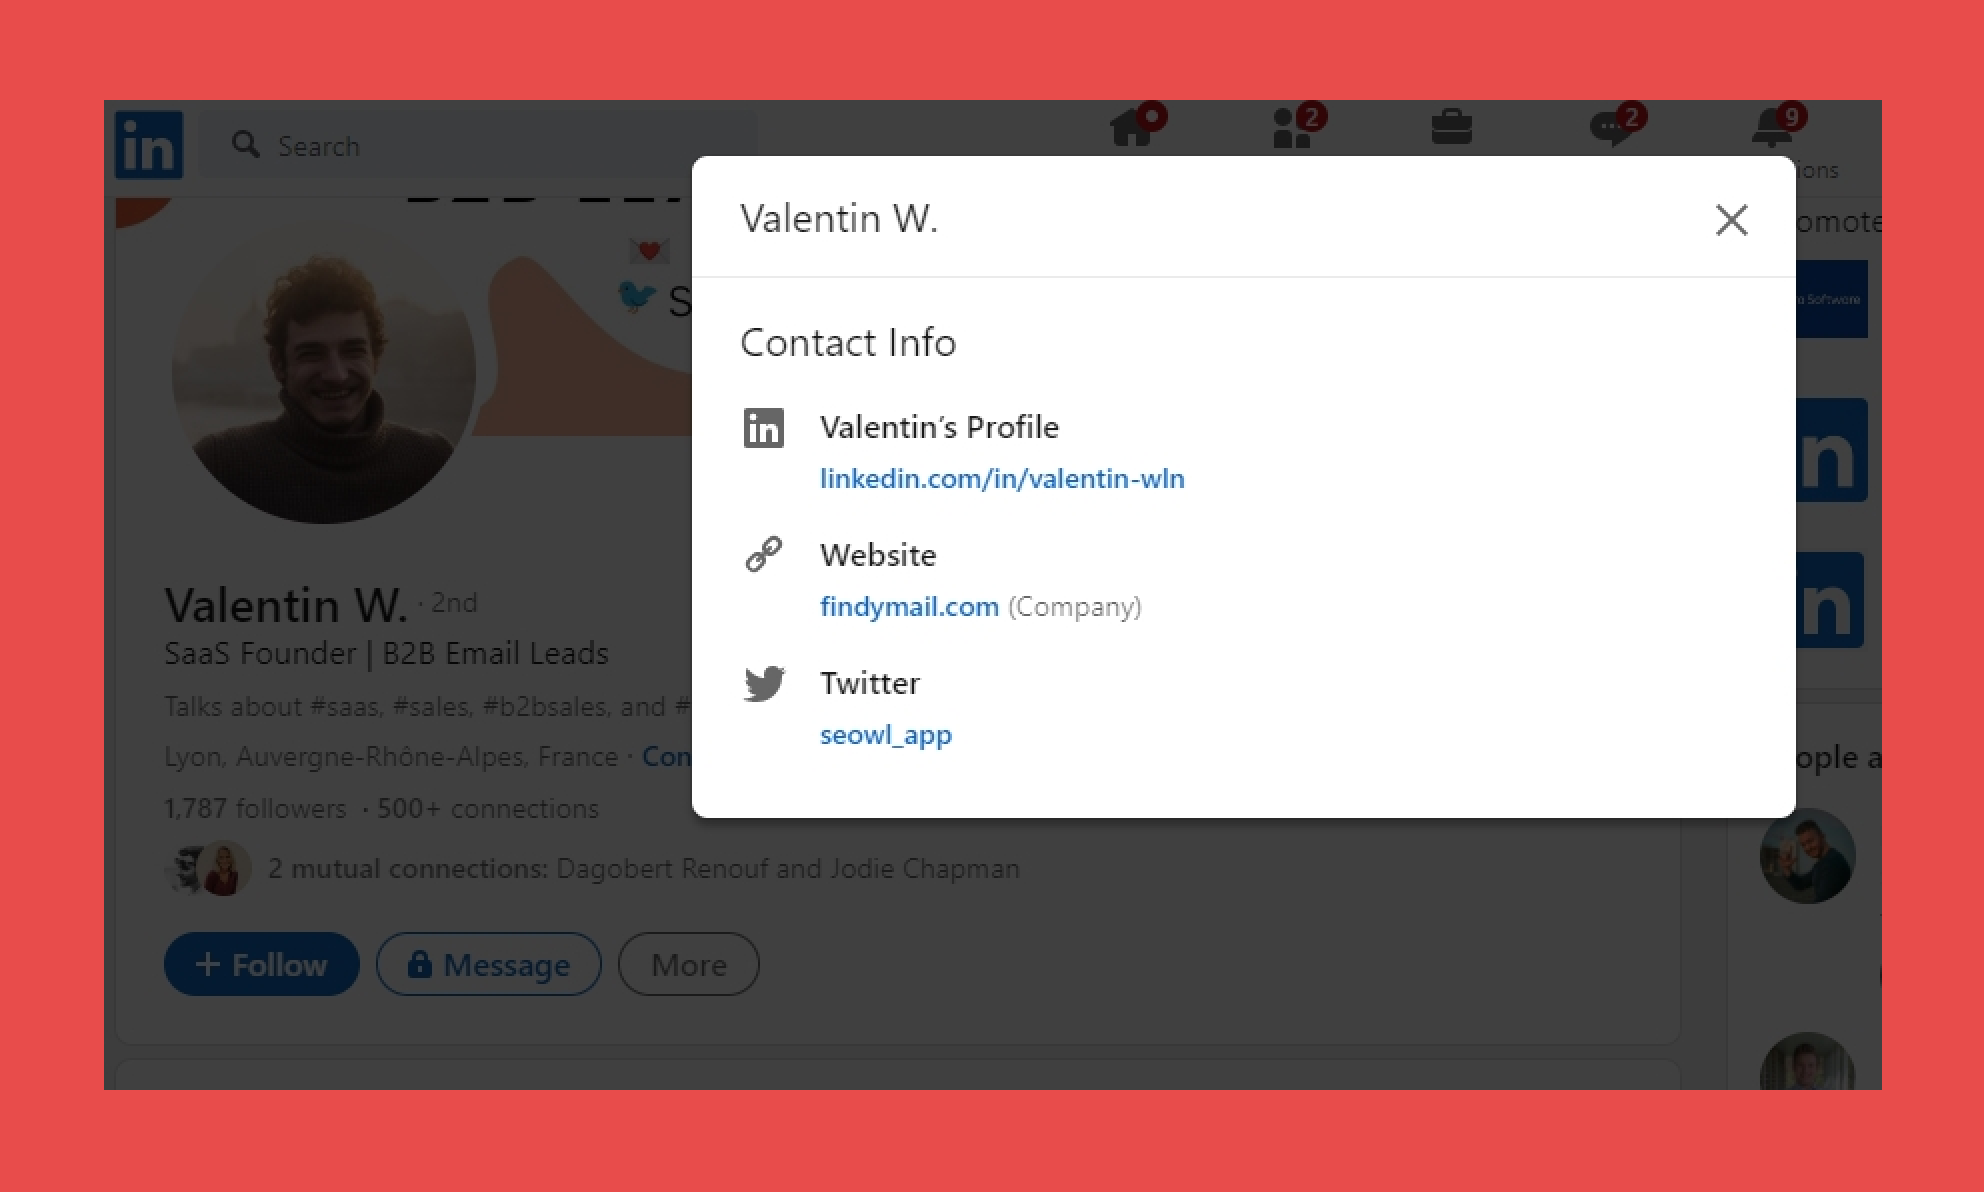
While this method for finding someone’s email on LinkedIn is relatively simple, it's not foolproof.
Some LinkedIn users choose not to make their contact information publicly available. This means you might not have access to an email address, even if the lead accepts your request to connect.
4. Download Email Addresses of Your First Degree Connections
Did you know that LinkedIn lets you extract information from your account, including the contact details of your first-degree connections?
- Head to your LinkedIn account and click the 'Me' profile icon near the top-right corner.
- Look for the 'Settings & Privacy' option.
- Click 'Data Privacy'.
- Find the 'How LinkedIn Uses Your Data' section.
- Click 'Get a Copy of Your Data'.
- Now, choose which data to extract. Focus your attention on the connections because that's where the email gold is.
- Select the connections option and hit the 'Request Archive' button.
After you enter your password, LinkedIn will compile the requested data and send it to your email address. Now, you just need to go through to pick out the email addresses you want.
5. Search Their Name on Google
When all else fails, turn to the mighty Google for assistance in your quest to find someone's email address. This technique, called dorking, harnesses the power of Search to find those hidden gems.
Here are a few ways you can leverage Google to find LinkedIn emails:
- Look for the person's website or company: Search to see if they have a website that includes contact data.
- Try out some targeted searches: Do specific search queries that combine the person's first name, last name, and domain to increase your chances of finding their email address. You can try something like firstname + @gmail.com or firstname + @company.com. You’ll need to experiment with different variations.
- Utilize the "site" search command: Another handy technique involves using the "site" search command. For example, you can try a search query like “[email protected] site:www.website.com." This narrows down your search results to the specific website, and Google will search the entire site for it.
I recommend this only if you have no connection with the lead on LinkedIn and no other method has worked.
6. Ask Them In a Private Message
Sometimes, the simplest solution is to just ask for what you need. However, because many people are reluctant to share their contact information online, it's important to approach this method with finesse and respect.
Before reaching out, ensure that your LinkedIn profile is in top shape. It should be a polished representation of your professional identity. Ensure you have an appropriate profile picture, an engaging headline and summary, and what value you offer. Get a few recommendations from your previous customers if you can! Basically, you want to convince them that they should give you their email address, and if your profile is well-presented and professional, you might succeed.
When sending the message, personalize it to build rapport. Take a moment to research their background, interests, or recent achievements. Mention something specific that caught your attention and made you want to connect further.
In your message, be transparent about your interest in obtaining their email address. Explain the purpose and value behind it. In short: treat it like you would a cold email! Here's a sample to get you started:
Hey [First Name],
Hope you're doing well! I wanted to send over something I think you’ll find useful but wasn’t sure which email is best for you. Let me know!
Thanks,
[Your Name]
[Your Company]
If you’re running a massive outbound outreach campaign, you won’t be able to message thousands of potential leads. Stick with this option only if you have a highly curated list of key leads or a few high-value prospects whose information you can't find any other way.
7. Find the Email Pattern
Companies often stick to predictable email patterns like {first name}@company.com, {first name}.{last name}@company.com, or {first initial}{last name}@company.com. Once you figure out the pattern, it’s easy to guess email addresses. All you need is LinkedIn to find employee names and apply the format.
An email permutator makes this process faster by generating multiple email variations in bulk. Instead of testing addresses one by one, you can automate the guessing game and improve your chances of finding a valid email.
The upside? It’s free. The downside? It takes time, creates a lot of false emails, and can lead to a high bounce rate — putting you at risk of being flagged as spam. Plus, you still have to validate emails manually.
If you’re serious about accurate B2B contact data and want to save hours of manual research, Findymail is the smarter way to go.
Sign up for our free trial and we'll show you what most data providers can't do in 10 emails or less: guarantee a bounce rate of %5 or less.

Valentin
Valentin Wallyn is the founder and CEO of Findymail, a SaaS platform he launched to help B2B teams discover accurate email and contact data and automate data enrichment at scale. With an IT background, Valentin combines a technical mindset with hands-on experience in outreach and growth. His work centers on improving data quality and prospecting efficiency, drawing on years of entrepreneurial experience and a deep understanding of what makes outreach campaigns succeed.
![How to Use LinkedIn Sales Navigator [Definitive Guide]](/blog/content/images/size/w300/2024/03/souvik-banerjee-JLj_NbvlDDo-unsplash.jpg)


![Your Guide to LinkedIn Sales Navigator Pricing [2026]](/blog/content/images/size/w300/2023/03/guide-to-sales-nav.jpg)