

Linkedin Sales Navigator is THE reference database for prospecting.
Why?
Because whenever you change jobs you update your profile on Linkedin first.
That makes it the most up-to-date list ... and Linkedin Sales Navigator is the tool to use to navigate that list and exploit its resources.
The thing is, most people don't know how to use Linkedin Sales Navigator (like you maybe if you're here?) or at least, not effectively. Yes, Linkedin is not just to post inspirational content.
So I've written this guide to show you exactly how to use Sales Navigator to get leads. We'll go from the basics for those that never touched it before up to the most advanced workflow so that by the end you have your very own machine generating leads every day.
Findymail bulk-exports your Sales Navigator leads and verifies their contact data in one step, so you can move from list to outreach without the manual work.
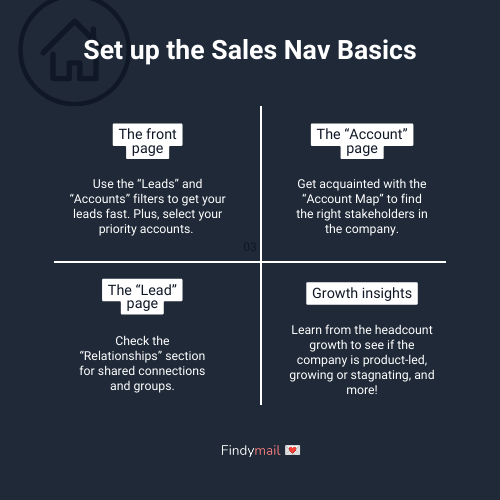
What This Guide Covers: Everything from setting up Sales Navigator correctly to advanced workflows that turn it into a daily lead generation machine.
The Key Sections:
1. Setup: Configure your email and alert preferences before anything else to cut the noise and only see what matters.
2. The Front Page: Manage saved account alerts and priority accounts to stay on top of key prospects.
3. The Account Page: Use headcount growth, new hires, and job openings to understand a company's priorities before reaching out.
4. The Lead Page: Find decision-makers, shared connections, and interaction history all in one place.
5. Search and Filters: The core of Sales Navigator. Master account and lead filters to build laser-targeted prospect lists.
6. Advanced Tips: Saved searches, boolean search, list building, blacklists, and sending unlimited InMails with the "Open" tag.
What is Linkedin Sales Navigator?
First of all, let's clarify what is Sales Navigator in the first place. Linkedin Sales Navigator is a product provided by Linkedin (and if you don't know what Linkedin is... what are you doing in sales??) and built on top of the popular social network.
It's basically a big database of all the people on Linkedin, that you can search and filter based on the data they put on their profiles. A more advanced version of the standard Linkedin search, in a way.
You can immediately see the value there: easily find and engage with prospects in your target audience. Very useful to generate leads & send messages to decision-makers!
How to activate Sales Navigator
Sales Navigator is a paid product. You need to sign up and subscribe here to activate that feature on your Linkedin account.
Different plans exist but in general the "Core" version is sufficient as the main value is in that database search. If you'd like to see a comparison of the different Sales Navigator plans (Advanced, Core, Advanced Plus etc.) and how much it costs, I've written about that here👇️
 Valentin
Is it worth it? In my opinion yes. It is much much more powerful than the regular linkedin version.
More of a video learner?
Here's the full guide on video:
Setting up Sales Navigator for success
The first step for an optimal Sales Navigator experience? Configure it the right way. It only takes a few minutes and will GREATLY improve your results - and it's very often (if not always) overlooked.
And you can easily understand why as even the settings button is a very little icon almost hidden but here it is :
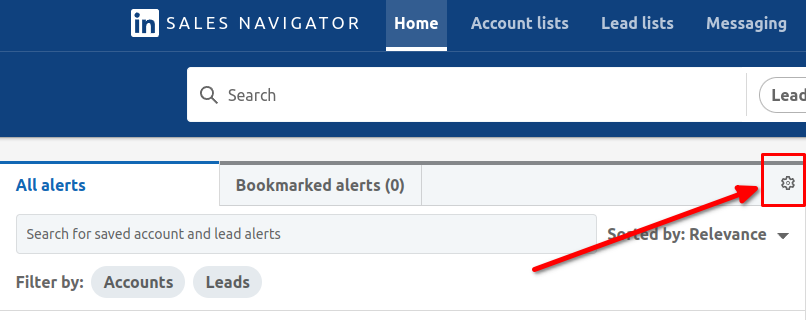
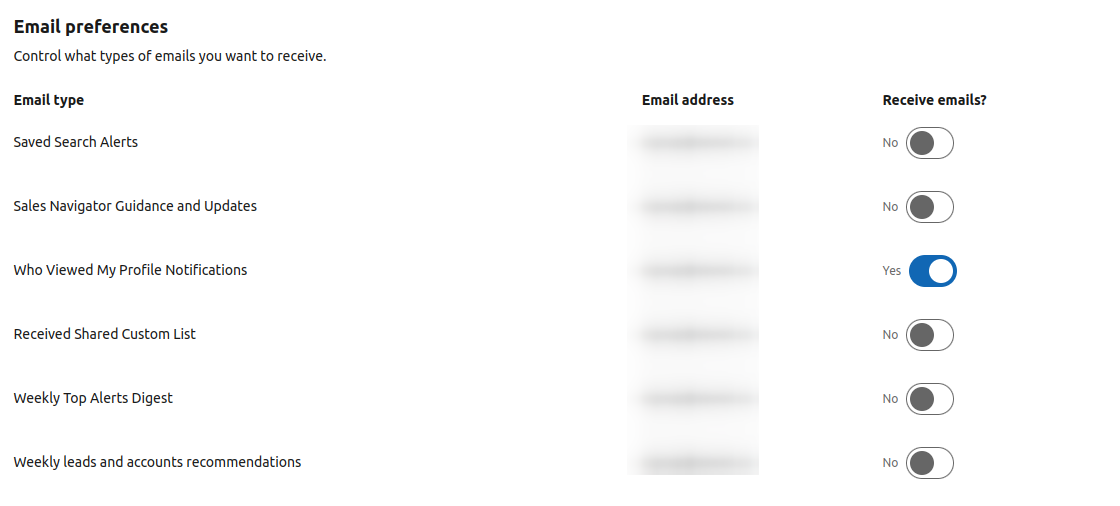
Click on it and access your Sales Navigator settings page and you'll see your email preferences. Our inboxes are already cluttered, so you'll want to set these up to filter out alerts that might trigger you to reach out to someone.
You'll see this logic in my settings. I only have emails turned on for 'who Viewed My Profile' because, realistically, that's the only action in this list that helps me advance my specific goal: to close more leads.
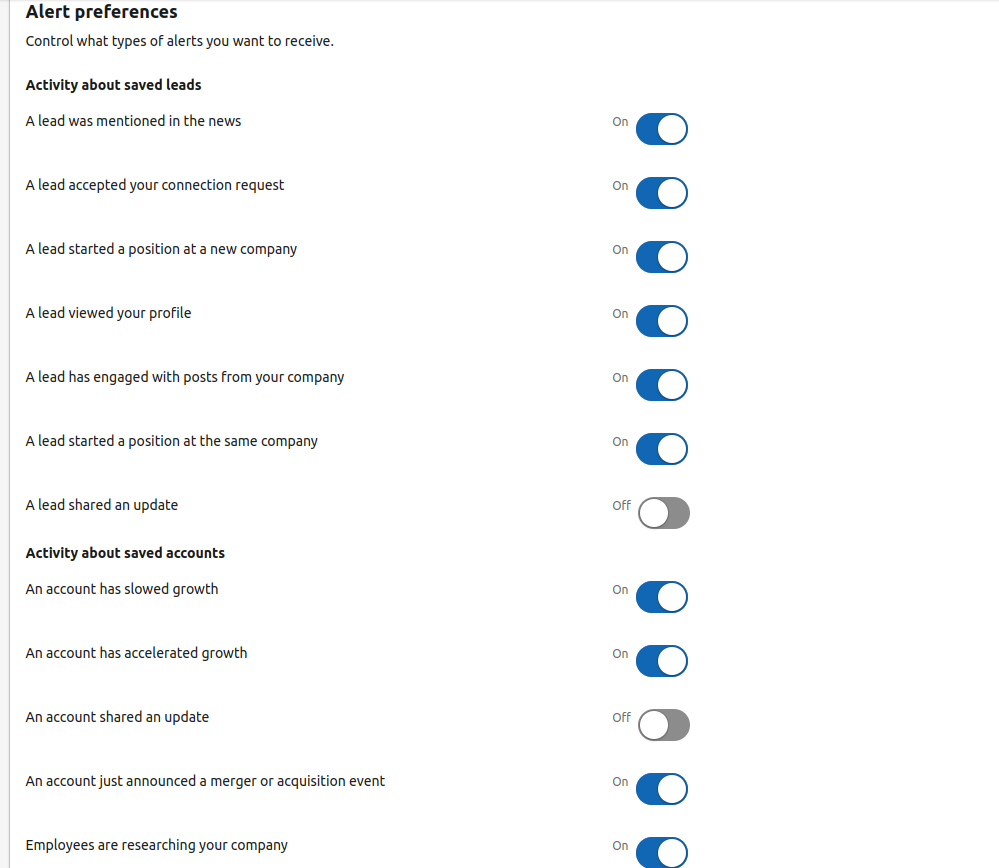
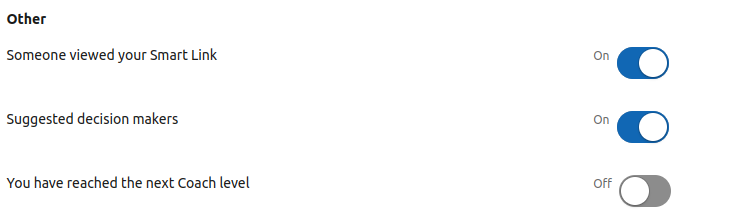
Now, scroll down again and you'll see your alert preferences. Don't confuse these with the email preferences that we just configured. Alerts are the core of the Sales Nav experience and front and center when you open the app.
I like to keep most of these turned on and only disable lead/account sharing updates. It's the same logic as with the email setting above. If an alert gives me time-sensitive information about a prospect, then I want to know. Otherwise, it's just noise.
Sales Navigator 101: The Basics
Linkedin Sales Navigator has a lot of features and it can quickly be overwhelming, especially if you leverage the team capabilities. Fear no more, we'll take you from beginner to expert in no time 😎
The Front Page
Let's take a quick tour of your front page, shall we? As you can see, the Front Page has two main areas:
- On the left side, we've got alerts about all the accounts you've saved. (This is what we configured in the previous step.)
- On the right side, you've got your priority accounts.
All Alerts
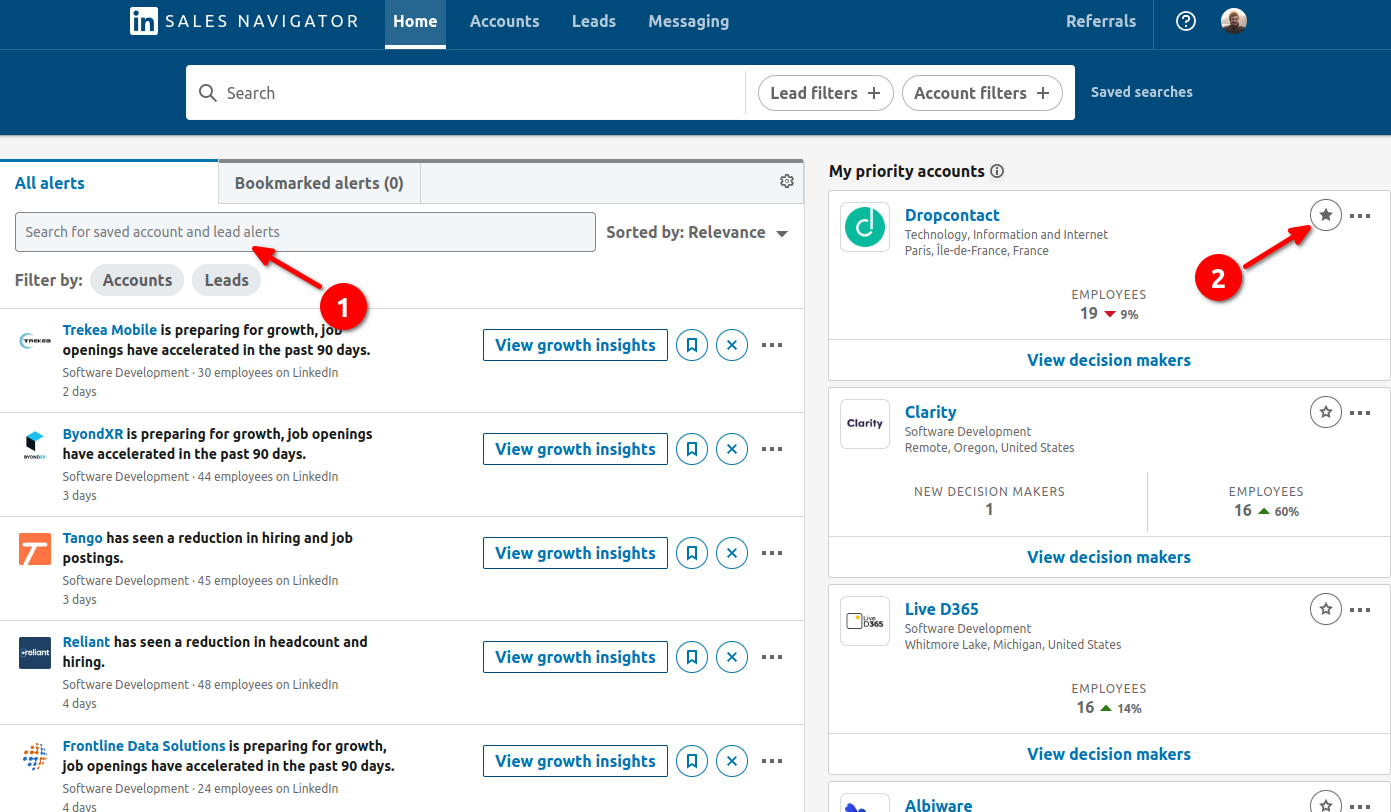
Since we already set up your alerts, we'll focus here on getting the most user out of them. Use the search bar tool to view only the alerts for a specific account or lead.
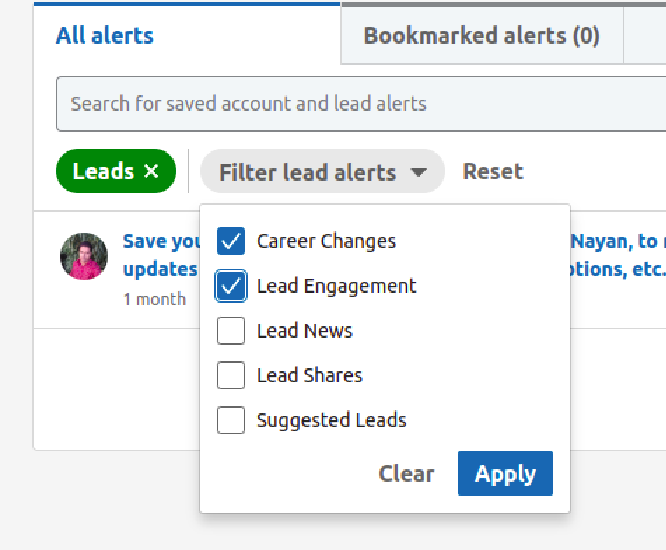
Here's a sneak peek at the filters I like to use for leads. I tend to avoid Lead Shares because if your prospect spends a lot of time on LinkedIn you'll get a ton of results. That said, you do what works for your process.
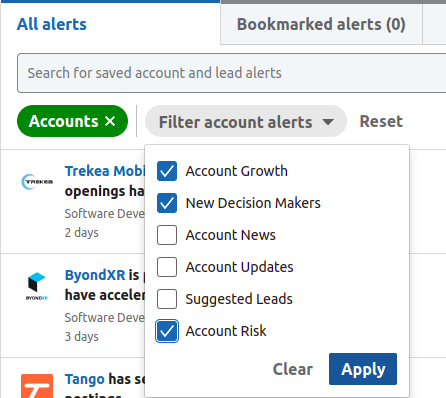
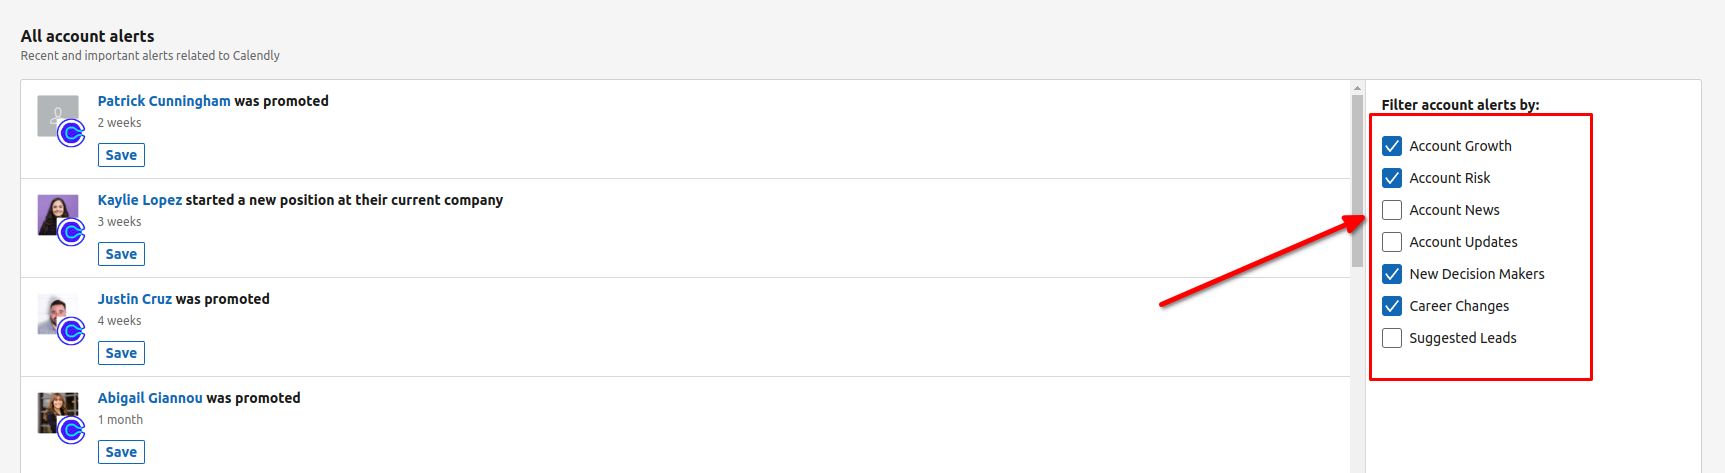
And here are my preferred filters for accounts. Again, I advise staying away from 'News' and 'Updates' alerts because they can generate a lot of unnecessary noise. That said, if you're in a long sales cycle and like to use industry news and updates as a hook, these can prove useful.
Priority Accounts
Now, lets focus on those Priority Accounts. As the name implies, these are the accounts you're watching like a hawk because you're currently working on them. Identify an account as 'Priority' by clicking the star icon in the top right corner.
If you don't select any yourself, this will get filled with system-recommended accounts based on your setup and preferences.
The Account Page
Now that we've nailed down the Front Page, let's take a closer look at an Account page. This is what you'll see if you click on any of the company names in your Alerts or Priority Accounts lists.
Looking for detailed information about a company? This is where you'll find it. The Account page has everything you need to know, from headquarters location to basic description to key decision makers.
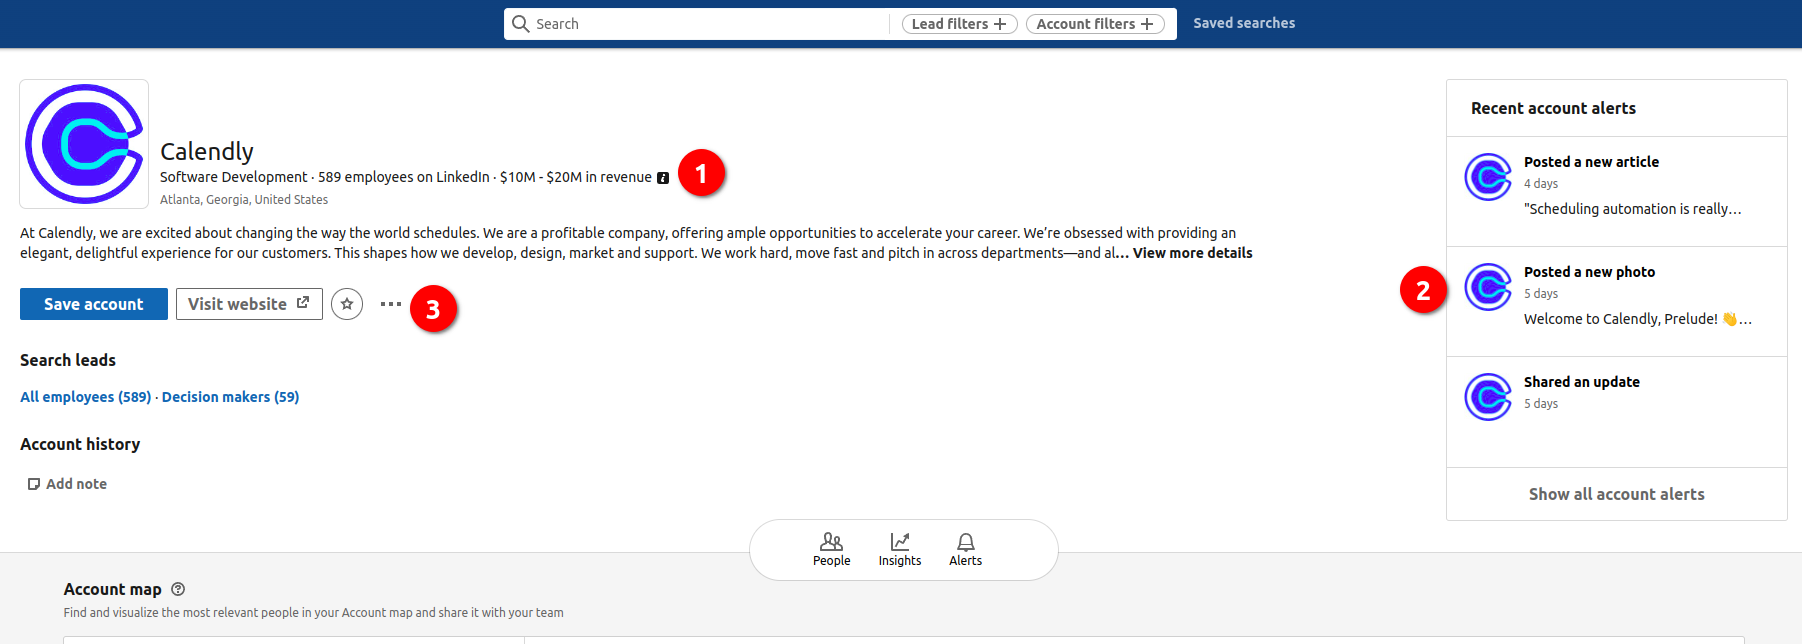
I want to highlight three key areas of the Accounts page that you can safely ignore. Yep, you read that right. I want you to scroll right on by these portions of the page because they seldom, if ever, provide any useful intel.
- Revenue. This is self-reported, which means it's probably outdated, inflated and certainly overrated. Don't rely on it.
- Company Alerts. Do you really need to know that the company posted an article two days ago? I doubt it.
- View More Details. If LinkedIn didn't think it needed to go on the main page, do you really think this information will help you close?
Let's keep moving, because the Account Map has some tasty little nuggets if you know how to read it.
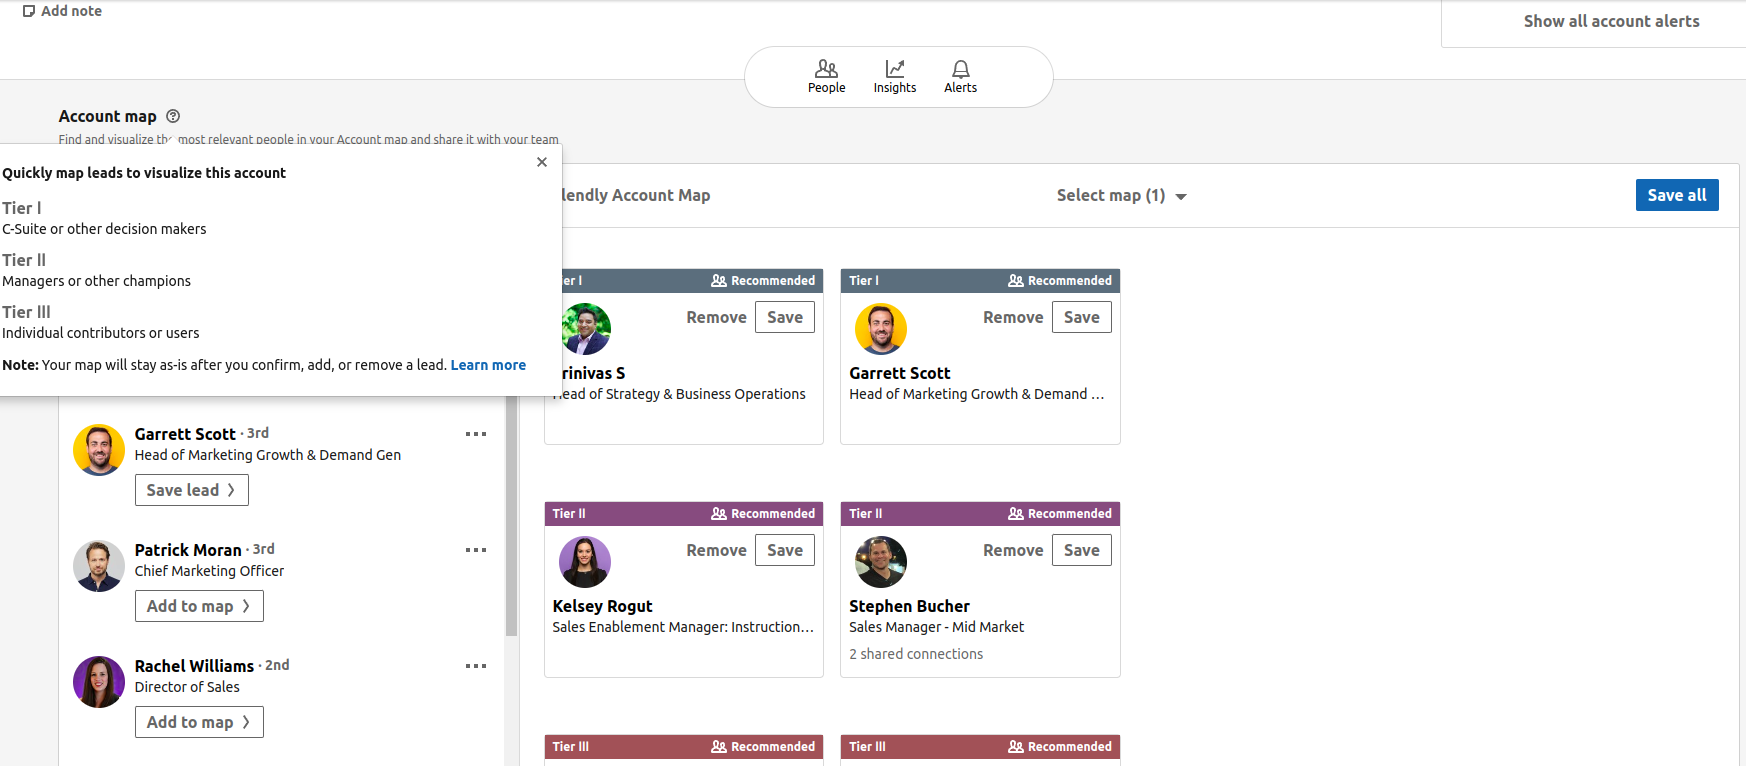
To make finding key leads easier, Sales Navigator auto-populates this diagram with decision-makers. It's organized in a hierarchy, so you can start to understand the company structure and get a rough idea of the chain of command. (Read: who you need to convince and in what order.)
Let's break down the three tiers LinkedIn uses to sort potential leads:
- Tier 1: C-Suite folks and other decision makers. The people who can actually approve a purchase, essentially.
- Tier 2: Managers and potential champions. They can't sign on the dotted line, but they can either connect you to someone in Tier 1 or persuade someone in Tier 1 that you're the best solution to their problem.
- Tier 3: Regular Joes. Depending on the type of campaign, you may want to reach out to folks at the employee level. In most cases, however, you can leave them off your lists.
Next up, we have growth insights, starting with headcount growth. This is exactly what it sounds like: a graph illustrating how headcount at your target company has evolved in the last two years.
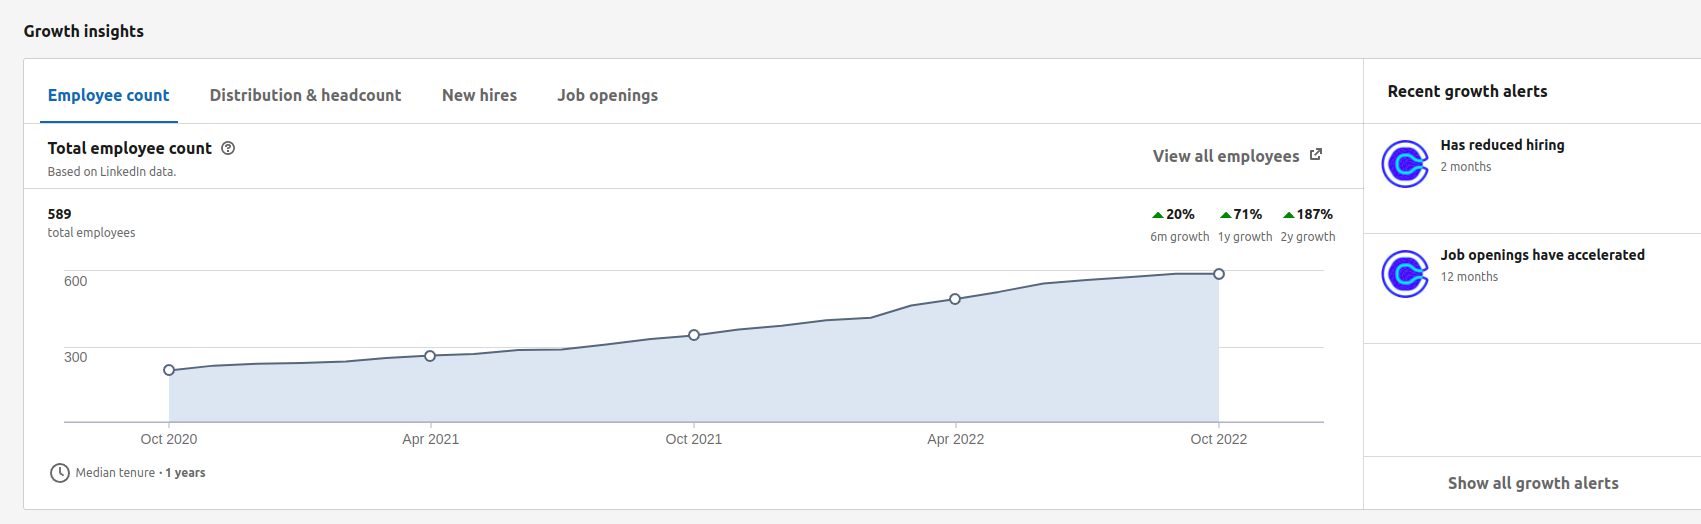
Here we can see that Calendly has fast growth and more than doubled its headcount over the last two years.
Why do we like this data? Headcount can help you understand the overall health of your target company. Lots of growth? The company has cash on hand may need you to help them figure out how to spend some of it. Slow or no growth? While the company may not be in decline, you'll need to work harder to close the deal unless you're the absolute best-fit solution for a pressing issue.
Click on the next tab for an even greater level of detail. Here, we can see the actual distribution of that headcount growth across different departments.
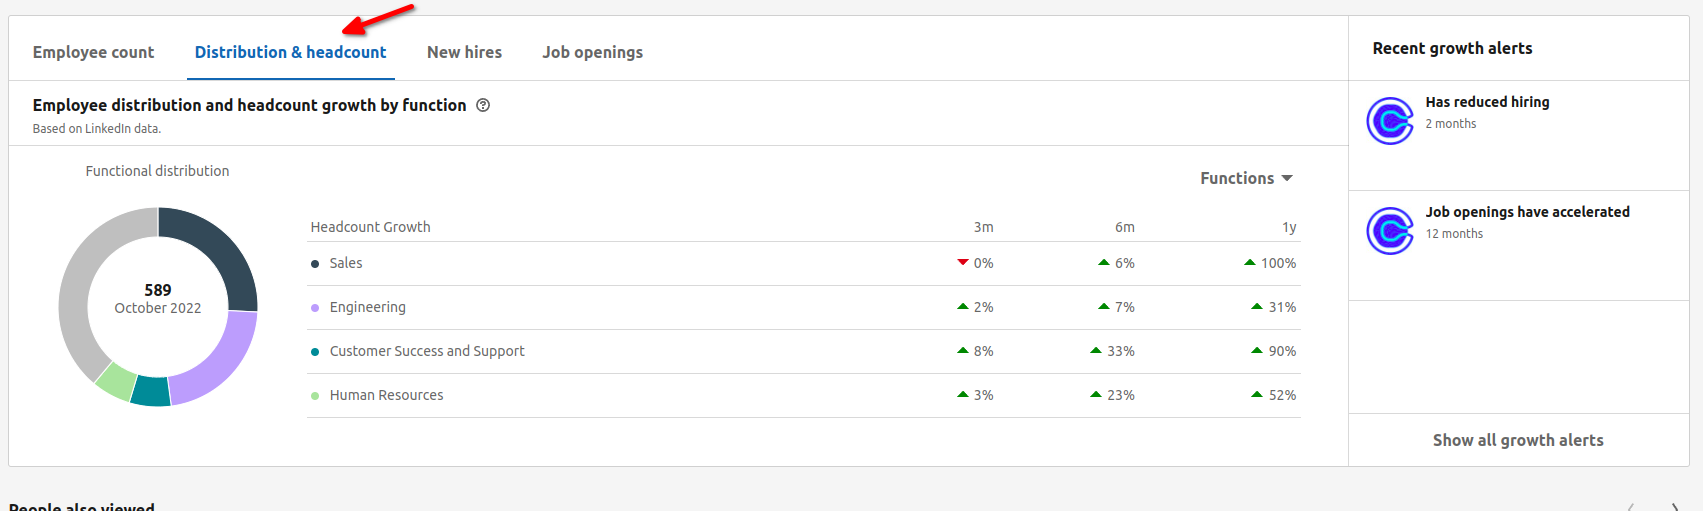
I like to give this a close look because it helps me understand the company's priorities. Lots of growth in development? It's probably a product-led company. More hires in sales and marketing? It's likely sales-led.
Looking at this graph, I can see that Calendly's sales department doubled in size over the last year. Maybe they're facing challenges as they scale that would make them a good fit for my particular product (Findymail).
Moving over to the next tab, 'New Hires' I can see exactly when someone joined the company. If headcount gives me the big picture view of what's going on inside a company, the timeline gives me the inside scoop on who has seniority - and who doesn't.
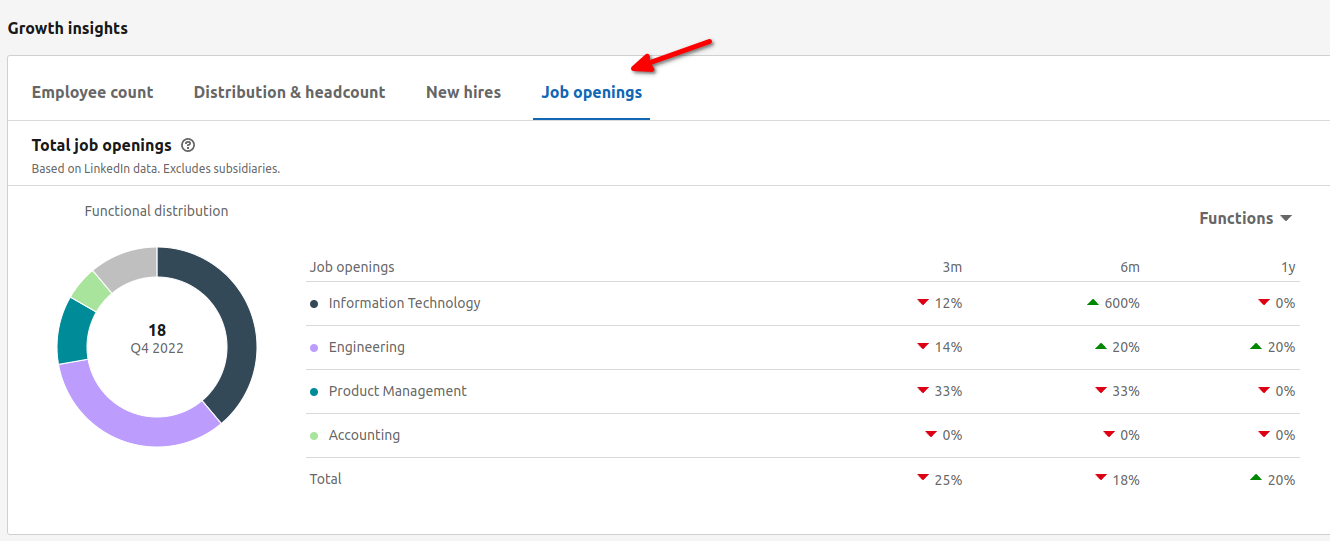
Finally, we have the 'Job Openings' tab. Whereas 'Headcount' and 'New Hires' give me backwards-looking information, this tab gives me an idea of where the company wants to go in the next few months.
In this case, I can see that Calendly seems to be doing a lot of recruiting on the engineering side. That doesn't mean they aren't still sales-led, but it does signal that maybe they also need solutions that fix problems in product development. Not so important for me, but if you're in that niche there's an opening for you that you might've missed if you'd moved on after the 'Headcount' tab.
Once you're through the Growth Insights, you'll see a list of system-recommended accounts. These are typically similar in some significant respect to the company you're currently viewing. You'll find the occasional gem so it's worth a look, but don't get hung up here.

Then you have the list of all account alerts. If someone associated with your target company takes action, you'll see an alert in this section. Knowing that Bob in Accounting just posted an article doesn't do much for my sales process and might lead me to miss out on important info, so I like to set up filters.
Here's a look at my setup for this section:
The Lead Page
Understanding the target company plays an important role in your outreach, helping you to craft effective offers and speak accurately to likely pain points. Eventually, however, you'll need to reach out to an actual human being who works for your target.
Enter, the Lead page. It looks like this:
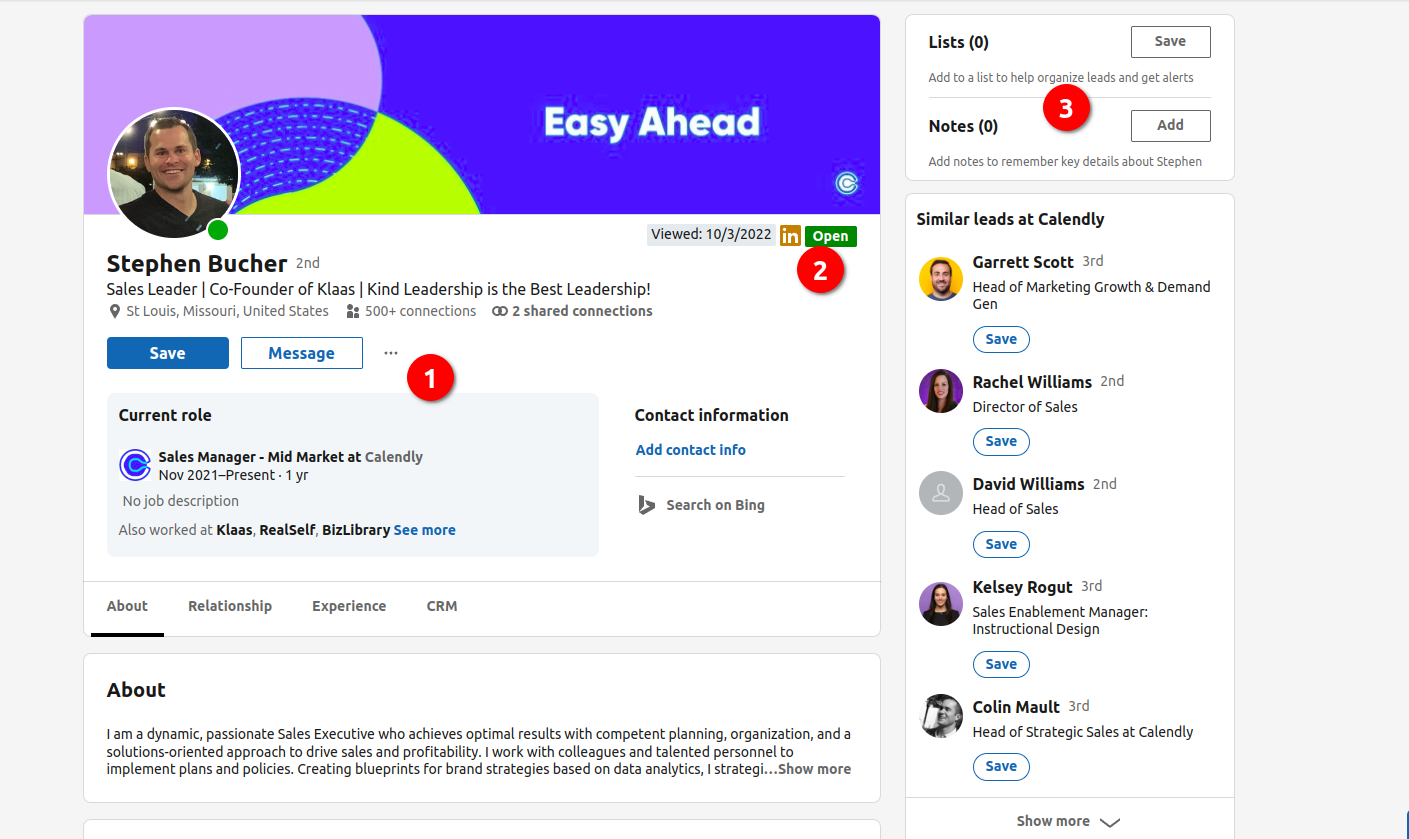
There's a lot of information here, but the similarity to a typical LinkedIn profile can make it difficult to find what you need. To make it easy, I've highlighted the three most important places in the lead page:
- Look here for a big picture overview of your lead. Name, title, current role/company, contact info (sometimes), location, etc.
- These dynamic tags help you keep tabs on how and when you've interacted with a profile. "Open" means you can send an inMail to that person without using one of your inMail credits. The "in" tag means your lead also has Linkedin Premium or Sales Navigator. You can even see when you last viewed or messaged that profile.
- Use the "Save" button on the right hand sidebar to add your lead to a specific list. You can also jot notes here, but I'm a firm believer that anything you might want remember about a lead belongs in your CRM.
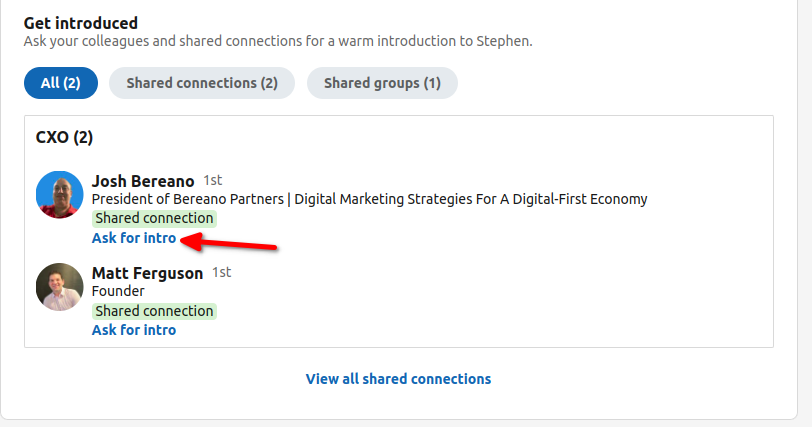
Moving down to the "Relationship" section, you'll gain visibility on all the ways you might share connections with your lead. If you're struggling to make contact, the 'ask for intro' feature can make all the difference. It's also really useful if you do social selling or influencer marketing.
The shared group can also be a golden nugget: if you notice that different relevant leads share the same group, you can assume that some other people in that group are relevant as well and use that group as a lead search filter to find them.
I won't say the rest of the Lead page can't help you out, but it doesn't differ all that much from a standard LinkedIn profile. I'll skip the screenshots, but you might take a second to check out the CRM section. If you've connected your CRM to Sales Navigator, you'll see if this person already exists as a lead.
Searching and Filtering
Here's the meat of Sales Navigator: using it as a big database that you can filter to find relevant leads and accounts to target.
That is to me the most important feature of Linkedin Sales Navigator so it's important you understand it correctly, especially for lead generation.
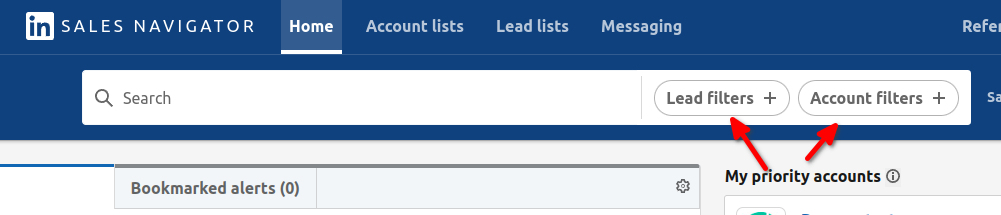
First to access the search page, simply click on the lead filters or accounts filters in the search bar on your homepage, depending on if you want to search for leads or for companies.
Let's start by reviewing the accounts filter.
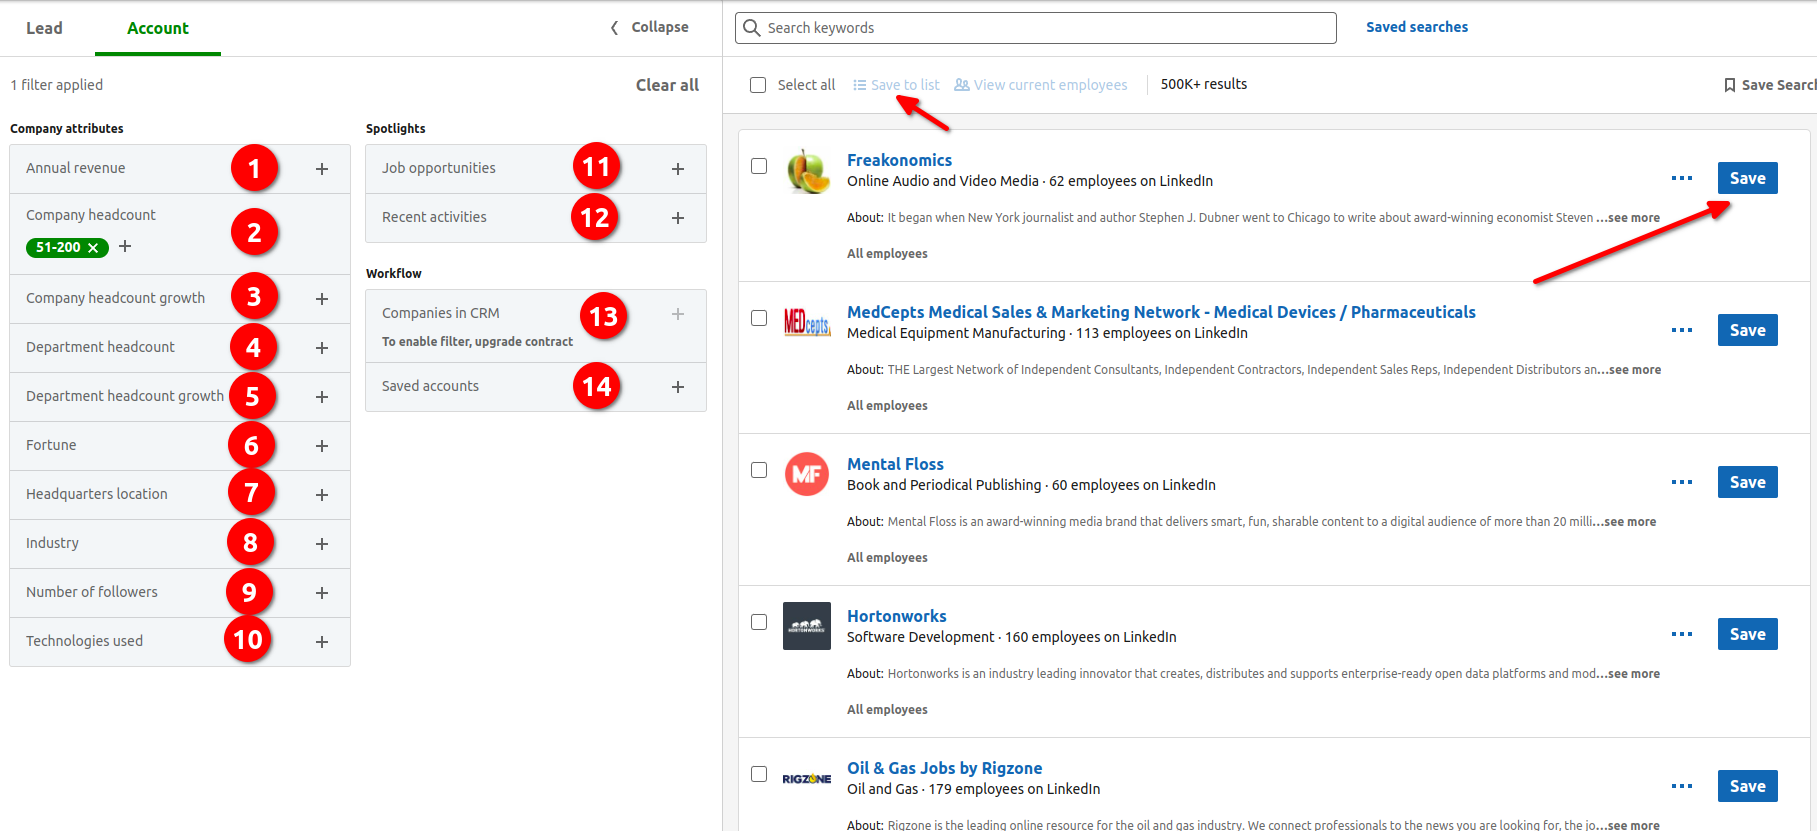
- Annual revenue: again I don't recommend using this as it's self-reported so not very accurate. You risk missing a lot of accounts if you use it. Or use with wide margins.
- Company headcount: Company size, you will use it in most cases as targeting big companies is not the same as SMB.
- Company headcount growth: Useful to target growing companies, I usually put >20% growth. One thing to note is that it's tracking growth over the last year only.
- Department headcount: Very useful if you're targeting a specific department. For example if you sell only to sales-heavy companies, you'll definitely use this.
- Department headcount growth: Same as 3. but at the department level. Again very useful if you're interested in a specific department.
- Fortune: if the company is a Fortune 500, Fortune 100 company etc. I don't use it but maybe you will need it.
- Headquarters location: Most likely you have privileged target countries: enter them there.
- Industry: You will use that one often as well, feel free to pick a few adjacent industry to your "main" ones as people often misclassified their company.
- Number of followers: I don't use it, not very useful
- Technologies used: Quite inaccurate I don't recommend using it. If you need to target technologies you will be better off with specialized tools such as Builtwith.
- Job opportunities: This can be useful if you're looking for companies that are currently hiring. The only downside is that it's hiring in general and you can't specify eg. hiring only new sales.
- Recent activities: Very useful, senior leadership changes and funding events are usually highly relevant signals you absolutely want to pick up.
- Companies in CRM: Self-explanatory, use it if you have your CRM synchronized.
- Saved accounts: can be useful once you have started actually saving accounts
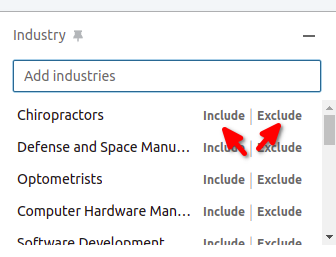
Most of these filters are "include only" but some of them can also be used to build exclusion. For example if you want all except one specific industry you can exclude it from your search.
Now let's do the same for lead filters:
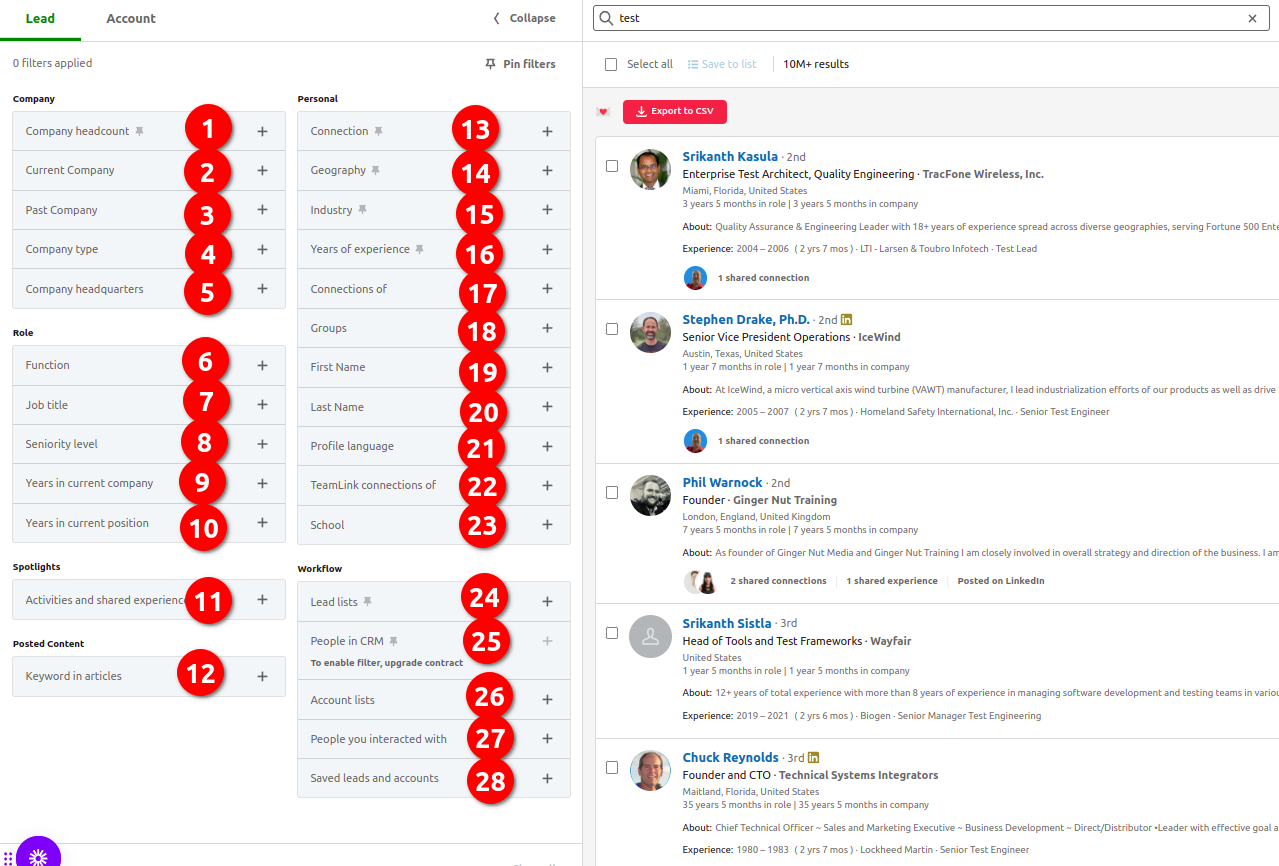
- Company headcount: Same as the filter in the Accounts section. It shouldn't be needed though if you already filtered your accounts and put them in a list.
- Current company: If you want to do some sniping inside a specific company otherwise no utility.
- Past company: Same as 2. but in the past.
- Company type: Can be useful if you're targeting a specific type of company only eg. Non Profit
- Company headquarters: Same as 1. shouldn't be needed.
- Function: What area they work in. Depending on the area this can be very accurate or very inaccurate. If you need to use it will mainly depend on what job titles you're targeting and if those job titles are specific to a department or generic.
- Job title: One of the most useful filters here you will use it all the time. Make sure to include all possible variations of your target job title!
- Seniority level: Same as 6., if you know the job title to target I wouldn't rely on it much.
- Years in current company: Can be useful if you want to target somebody that has been X years working at a company.
- Years in current position: Same idea as 9.
- Activities: Very underrated filter. Some hidden gems are here, highly recommend having a look. One of my favorite filters is "Changed jobs in last 90 days" as it's a highly relevant signal -> people starting a new position are often expected to make changes and try new tools etc. "Posted on Linkedin recently" is another very good one, especially if you're doing some social selling.
- Keyword in articles: I don't recommend using it for the simple reason that almost nobody is posting articles on Linkedin so you will get rid of 99% of your leads
- Connection: Are they a 1st, 2nd, 3rd-degree connections on Linkedin? Do you belong to the same group?
- Geography: Can be useful even if you filtered for the geography of the company as some companies are multinational.
- Industry: /!\ warning there, it's NOT the company industry but the self-selected industry on the user's profile. Often not accurate, I recommend using the company industry instead
- Years of experience: self-explanatory
- Connections of: If they're a connection of somebody. Can be useful to target the connections of your competitors 👀 or of a friend
- Groups: If you want to target people in a specific Linkedin group
- First Name: No use except if you're looking for someone in particular?
- Last Name: No use except if you're looking for someone in particular?
- Profile language: Can be useful if you want to make sure they speak a given language
- TeamLink connections of: Same as 17. but with TeamLink
- School: Not very useful unless you want to do a campaign with school personalization.
- Lead lists: Very useful once you start organizing yourself in different lead lists. This will help you create relevant sub-lists. You can also use those as exclusion to only find new people you haven't reached out to.
- People in CRM: Again, can be useful if you have your CRM synchronized.
- Account lists: A must! Once you've created an account list you will use it here to find the right people in those companies.
- People you interacted with: Exclude people where you already saw their profile or contacted them.
- Saved leads and accounts: Self-explanatory
Being able to use that advanced search feature effectively is what separates beginners from Linkedin Sales Navigator experts.

InMails
I've already written about it here and this guide is already quite long so here you go:
Valentin
Sales Navigator Advanced Tips & Tricks
So far what we've seen is pretty standard usage. Let's now see how to get the most out of Linkedin Sales Navigator: the advanced stuff, the best practices, the real deal!
Getting the most out of lists
Lists are really helpful to segment your data so you should be using them all the time. With effective lists built, your leads and accounts searches will become much easier because you will be able to leverage the "Leads lists" and "Accounts lists" filters we've seen above to create highly relevant searches.
One trick is to use lists to build other lists: you start by building one broad list and then use that list as a filter + some additional filters to narrow it down. At the end of the process you end up with multiple nicely-segmented lists you can work with + master lists if needed to easily create new segments.
Leveraging saved searches
Saving a search is a very underrated tactic on Sales Navigator. If you configured your Sales Navigator right as described above, it means you will receive a notification whenever a new lead/account is added to one of your saved searches. And that's your opportunity!
The goal will be to save searches that have events where timing is important so that you can be notified and act on them instantly.
For example :
- on a lead search: save a search with the filter "Changed jobs in the last 90 days" (and your other filters) and you'll find out right away when say, a new hire is on your target role.
- on an account search: the "Funding event in the past 12 months" filter can be a bit outdated... but if you save the search, you'll get notified instantly of that funding event
You need to have that tool in your arsenal.
Understanding the filtering system
To get the most out of Sales Navigator you need to really understand how each part of the advanced search works otherwise you will get unexpected results.
For example, do you know where the "keyword" filter is looking the keyword for?
You must assume it's looking at the profile headline + description, maybe the job description?
But the correct answer is it's looking for the keyword everywhere in the profile. Including in past experiences, education, etc. that are in most cases irrelevant to your prospecting effort.
Quick tip: if you're using Findymail to extract your Sales Navigator results, you will have an additional column "keyword_match" telling you if yes or no the lead actually matches your keyword filter in the profile description + job description. This can help you quickly clean your results.
Creating an account list from a .CSV upload
Do you have a list of accounts from somewhere else (maybe your CRM) and want to use it in Sales Navigator for Account-Based Marketing?
Say no more, if you have it as a CSV file you can upload directly as an account list to use it directly in Sales Navigator. Follow the guide :
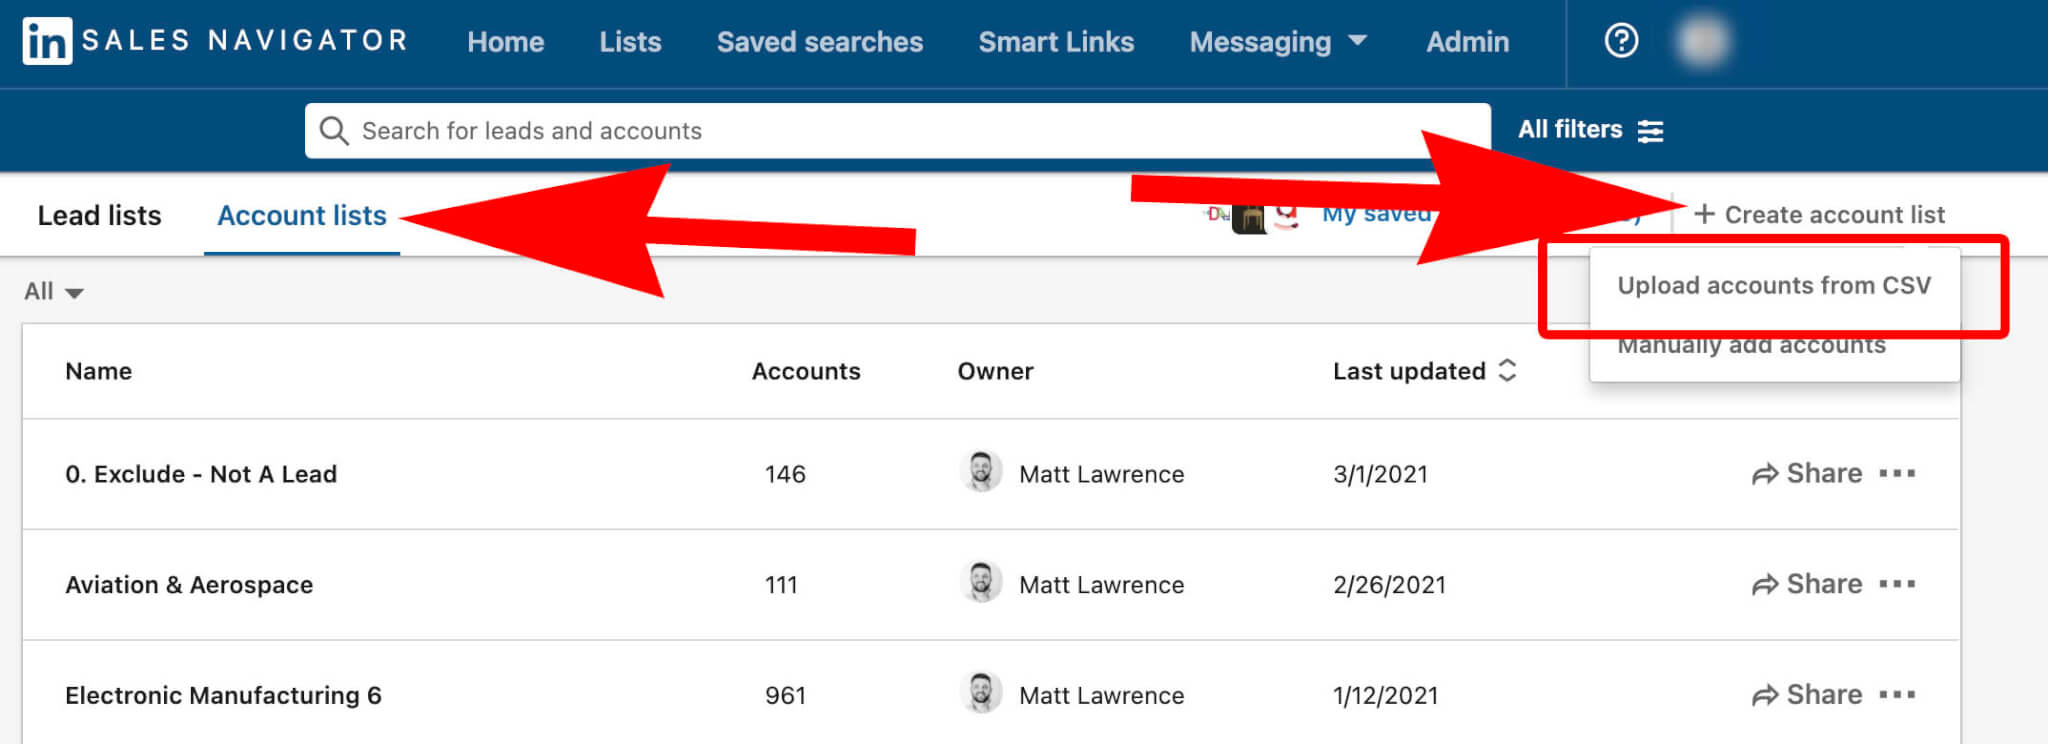
- Click Accounts at the top of the page.
- Click the Account lists tab.
- Click Create account list and select Upload accounts from CSV from the dropdown that appears.
- Add your CSV to the Upload account list window, then Map the column headers in your CSV to LinkedIn’s account fields.
- Name your list and click Finish
A few things to note :
- Make sure your accounts are in CSV (comma-separated values)
- Maximum 1000 accounts at once
- Make sure your CSV file includes columns containing the account name (required) and other relevant fields (optional)
Mastering the boolean search
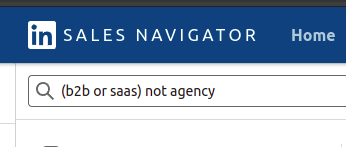
Remember the keyword search bar? It's actually more than a simple keyword research... It supports boolean search.
Boolean search? Wat means??
edit: I actually did end up writing a full article on this, so check it out here 🙈
Valentin
Sending unlimited inMails
You're limited to a few inMails every month... it's not enough!
How can you get more inMails? 🤔 ...
Remember that "open" tag in Sales Navigator profile?
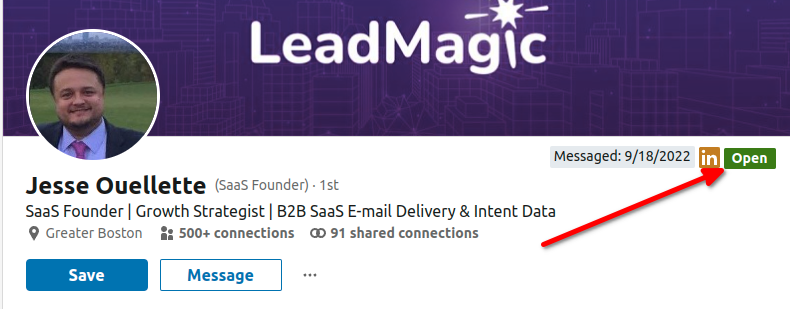
It means you can send an inMail message to that person for free. That's right, sending an inMail message to that person won't cost you one of your inMail credits.
That means you can find profiles matching that criterion and send them inMails for free - this will greatly increase the amount of inMails you can send per month.
Maintaining a blacklist
A best practice on Sales Navigator is to maintain a special list of accounts that you don't want to contact ie. a blacklist.
This will include accounts such as your customers, your competitors etc.
You can then use that as an exclude filter in your searches so that you're sure you don't contact such accounts by mistake and only keep qualified leads. This is especially useful if you don't have the CRM integration enabled. Make sure to share this with your team!
Using LinkedIn Smart Links
With Linkedin Sales Navigator, you also get a feature called smart links. I've written about that here:
Valentin
Getting Sales Navigator for cheap/free
If you're on a budget, there are a few ways you can get Sales Navigator for cheaper than the full price tag.
The first thing to do if you haven't already is to leverage the one-month free trial. When you first subscribe to Sales Navigator, Linkedin offers you one month for free. If you don't want to pay/continue after that, you can cancel your subscription for free.
Now if you already used this tactic, another thing you can do is go on fiverr.com and look for "activate sales navigator" gigs. You can usually find some reselling seats from enterprise plans at discounted prices...
Don't tell Linkedin though 🤫
F.A.Q.
Let's finish with some rapid-fire questions to make sure we cover everything!
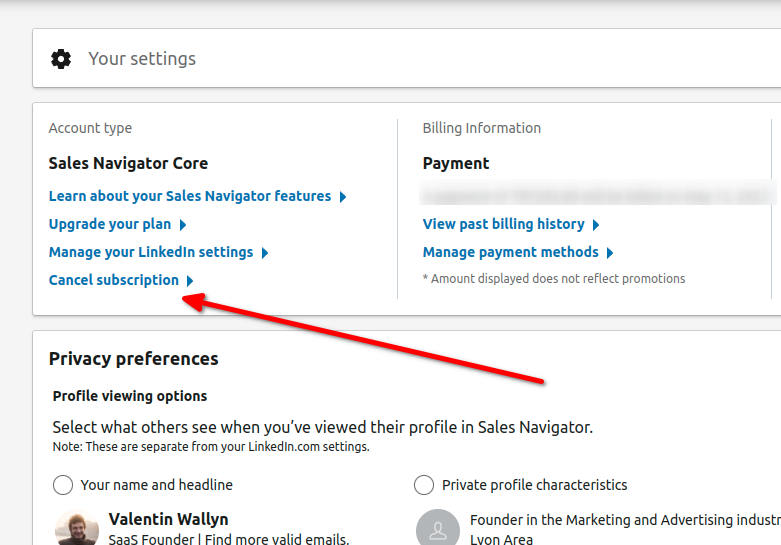
How to cancel Sales Navigator?
To cancel Sales Navigator, you need to go to your Sales Navigator settings page. There you will be able to click on "Cancel subscription".
Does Sales Navigator show profile views?
Yes, all Sales Navigator subscriptions also include Linkedin Premium which allows you to see who viewed your profile. If you're subscribed, you can see that on your "profile views" page.
So, what's your excuse? You now have access to millions of B2B leads and potential customers through the power of Linkedin Sales Navigator.
Findymail turns your Sales Navigator lists into verified, outreach-ready contact data in seconds. No manual research, no bounced emails, no wasted effort.

Valentin
Valentin Wallyn is the founder and CEO of Findymail, a SaaS platform he launched to help B2B teams discover accurate email and contact data and automate data enrichment at scale. With an IT background, Valentin combines a technical mindset with hands-on experience in outreach and growth. His work centers on improving data quality and prospecting efficiency, drawing on years of entrepreneurial experience and a deep understanding of what makes outreach campaigns succeed.
![Your Guide to LinkedIn Sales Navigator Pricing [2026]](/blog/content/images/size/w300/2023/03/guide-to-sales-nav.jpg)


![Best LinkedIn Email Extractor Tools [2026]](/blog/content/images/size/w300/2024/02/pexels-pixabay-221538.jpg)